

Hunting For Bugs With AFL 101 - A Primer
Background#
This post is the first of a 2 part series, which aims to provide the reader with a primer into the process of searching for software vulnerabilities within a binary application through fuzzing. The idea is to provide a wholistic overview of the entire process, beginning with the preparation of a system for fuzzing, optimizing tools, preparing the target binary for fuzzing, performing the actual fuzz, and finally reviewing AFL outputs to identify potential security vulnerabilities.
Part 2 of this post will delve deeper into the topic of crash exploration.
Let’s begin
Fuzzing 101#
Fuzzing is a term used to describe a testing technique that is focused on identifying anomalies within an application, through the evaluation of how the application responds when presented with different inputs. The concept of fuzzing is not new by any means and is effective employed during a web application penetration test to identify web vulnerabilities such as SQL injection and cross site scripting.
Today however, we are going to take a look at fuzzing a binary. Fuzzing a binary is an extremely effective technique to identify bugs in code that may otherwise go unnoticed, and is a popular first step taken by security researchers towards discovering exploitable zero day vulnerabilities.
The concept of fuzzing is quite simple. When fuzzing a binary you repeatedly run it thousands of times, each time providing a slightly different input file. Unaturally, you want your input files to cause the target to crash, because crashes tend to mean memory corruption, and memory corruption can sometimes lead to something more sinister such as remote code execution. There are three main types of fuzzers in use today: dumb fuzzers, targeted fuzzers, and feedback driven fuzzers:
Dumb Fuzzers#
Basic idea is to feed target application with randomly mutated input. For example randomly mutate jpeg image, and run it through the image conversion library expecting it to fail. Despite being simple in use, and extremely fast, successful crash is very dependent on the luck of the random mutation. Dumb fuzzers are not suitable for testing applications that verify integrity of the content, as randomly mutated file will almost always break the check sum. Other issue is that dumb fuzzers can’t help with deep understanding of reason of crash, as they simply flip random bit’s and hope for the crash. Most common example is zzuf. Its popularity is due to the fact that one usually can get dumb fuzzing up and running easily within an hour.
Targeted Fuzzers#
As you can guess by the name, this type of fuzzing is based on fuzzing very specific parts of the application. For example, if we want to fuzz rar archives, we might want to use targeted fuzzing, by performing random mutation to the content of the archive, while updating the value of CRC checksum. You can go very deep with these type of fuzzers, and find very interesting crashes, if you know where to look. Unfortunately setup generally takes a long time, you have to understand the format and the application you are dealing with, and write rules that will tell fuzzer what to fuzz, when and how. Examples of targeted fuzzers: Peach Fuzz, Sulley
Feedback Driven Fuzzers#
These are same as dumb fuzzers, start with performing random mutations on the input data. But instead of just logging the output of the operation, feedback driven fuzzers adjust their fuzzing based on the output, generating families of similar type of mutated input, and trying to narrow the list of possible malicious input that is required to crash the program. This gives fuzzer an ability to go very deep inside the code, and find very hidden bugs. Feedback driven fuzzers can be nearly as simple to use as dumb fuzzers. The downside is warm up, as the fuzzer needs to find something to start learn and target input, and until then it’s just a dumb fuzzer waiting for it’s moment to bring the big guns. Examples: American Fuzzing Lop, honggfuzz.
The Fuzzing process is highly automated and tool dependent. The automation provided by tools make the entire process of creating thousands of unique input testcases and repetitively running and terminating the target binary practical. In this blog post we are going to be using a popular tool known as “AFL” (an acronym for “American Fuzzy Lop”) to assist us on our journey.
Basic AFL Concepts#
Available from http://lcamtuf.coredump.cx/afl/
American Fuzzy Lop (AFL) is an open source fuzzer which has been instrumental in discovering numerous vulnerabilities within many of today’s popular software packages such as nginx, OpenSSH, OpenSSL and PHP to name a few. The “bug-o-rama” trophy case available on lcamtuf’s blog is extremely impressive and is a testament to the abilities of AFL. American Fuzzy Lop works on x86 Linux, OpenBSD, FreeBSD, and NetBSD, both 32- and 64-bit. It supports programs written in C, C++, Objective C, compiled with either gcc or clang.
The process of using AFL is pretty straight forward
- Compile a binary using AFL’s compiler wrappers
- Fuzz the binary using afl-fuzz <— this is where the magic happens.
- Review any unique crashes reported by afl-fuzz. Unique crashes occur if any of the afl-fuzz modified input files, result in the target binary crashing.
The work-flow of afl-fuzz is as follows:
- afl-fuzz takes a testcase file as input from the PATH specified using the -i parameter, and executes the target binary, then monitors the binary activity for normal operation or a crash, if no crash is detected afl-fuzz terminates the binary and proceeds to step 2.
- afl-fuzz then makes a minor modification to the initial testcase file and executes the target binary once more using this new testcase file as input, monitors the activity, repeats the cycle.
- afl-fuzz makes another minor modification to the testcase file and executes the target binary again in the exact same way using the modified file as an input, once again afl-fuzz monitors for activity. In this particular example, the modified testcase file causes the binary to crash! If this happens, afl-fuzz will place a copy of the testcase file (that caused the crash) into the /crashes directory within the PATH specified using the -o parameter. afl-fuzz will then continue, by modifying the testcase slightly and repeating from step 1.
What is Instrumentation?#
The first step in the process described above is a critical step, for when a binary is compiled with AFL’s compiler wrappers for C or C++, the source code is “instrumented”.
“Instrumentation refers to an ability to monitor or measure the level of a product’s performance, to diagnose errors and to write trace information” - Wikipedia. Simplistically, “instrumentation” in our context will take place during compilation of the target binary source code. It is the process of inserting small amounts of additional code into the binary, in a way that does not disturb the memory references used in the instructions of the binary program. The code added during instrumentation is sometimes called “instrumentation code" and it is through this instrumentation code that we achieve the ability to monitor and measure what is taking place within memory, whilst the binary is execurting, and more importantly when a crash occurs.
Building the Fuzzing Enviornment#
Now let’s get to work building the fuzzing environment, which will be comprised of the following components:
- An out-the-box install of Linux Ubuntu 14.0.4
- Pre-Requisites (gcc, clang, gdb)
- American Fuzzy Lop (AFL)
Environment Preparation#
A number of pre-requisites are required. Not only for AFL, but also for later crash analysis. All pre-requisites can be easily obtained from the Ubuntu repositories. We will require the build-essential package, as well as the latest clang and gcc compilers. We also require the gdb debugger for crash file analysis.
To install the pre-requisites we issue the commands below:
$ sudo apt-get update
$ sudo apt-get install build-essential
$ sudo apt-get install clang
$ sudo apt-get install gcc
$ sudo apt-get install gdb
Next, let’s create a basic directory structure to streamline our efforts similar to the one below. The structure shown below is optional and not required, so feel free to use a directory structure of your choosing. My personal preference is to generally follow a structure similar to the following.
~/
  |_AFL       <--- directory for the AFL program
  |_targets   <--- directory for the target applications
        |_in  <--- directory for sample input files
        |_out <--- directory for AFL output.
Building AFL#
AFL can either be obtained directly from the Ubuntu repo, or alternatively can be compiled directly from source. In our case, we will be compiling from source, but instructions for those who prefer using the repo are shown below:
Install from Repo:
sudo apt-get install aflInstall from Source (At the time of writing the latest version of AFL is 2.36b)
$ cd ~/AFL && wget http://lcamtuf.coredump.cx/afl/releases/afl-latest.tgz
$ tar xzf afl-latest-X.tgz
$ make
$ sudo make install
Once the above commands are executed successfully, AFL should theoretically be functional. But before we begin fuzzing, let’s make some minor performance modifications to our system.
Optimizing the Fuzzing Environment#
Next step is to optimize the fuzzing environment. This optimisation is useful to obtain performance benefits, but also may result in an improvement in detection capability. There are many ways to reap improvements during the fuzzing process, however as this is a basic primer, we are going to make 2 modifications. Firstly, we will enable the afl-clang-fast and afl-clang-fast++ compiler wrappers, these can provide compile time speed improvements as well as performance improvements during the actual fuzzing process.
Inside the ~/AFL/afl-2.26b folder is a directory called llvm_mode, this directory contains the source for the “afl-clang-fast” clang wrapper.
By running the below commands we will build and install afl-clang-fast, which is generally results in a nice speed boost during the fuzzing process.
$ cd ~/AFL/afl-2.36b/llvm_mode
$ LLVM_CONFIG=llvm-config-3.4 make
$ cd ../
$ make install
Once completed the afl-clang-fast and afl-clang-fast++ compiler wrappers should be available for use. A quick method to verify this is to run the following command and to observe the output
$ which afl-clang-fastThe output should be similar to below
$ which afl-clang-fast
$ /usr/local/bin/afl-clang-fast
The second performance booster we will take advantage of is called Address Sanitizer (ASAN). AddressSanitizer is a fast memory error detector for C/C++. It consists of a compiler instrumentation module and a run-time library. AddressSanitizer is a part of LLVM from version 3.1 and a part of GCC from version 4.8. ASAN does not offer any speed performance benefits, in reality it has been known to cause performance degradation of up to 2X. In most secenarios this trade off is acceptable, as ASAN can significantly increase the probability of detecting the following types of bugs:
- Use after free (dangling pointer dereference)
- Heap buffer overflow
- Stack buffer overflow
- Global buffer overflow
- Use after return
- Use after scope
- Initialization order bugs
- Memory leaks
To make use of AddressSanitizer, compile and link your program using afl-clang or afl-clang-fast with the -fsanitize=address switch set
AFL should now be ready to go.
Selecting and Preparing a Target#
As previously mentioned, in order to perform binary fuzzing we need to first compile application source code using AFL’s compiler wrappers in order to instrument the binary. Let’s continue the fuzzing process by obtaining the source code for our target application. The program being analyzed for demonstration purposes is a simple gif to png conversion program - I’ll refer to the program as “target-app”. The latest release of source code is available via the Ubuntu repo’s.
$ cd ~/targets
$ apt-get source target-app
$ cd target-app
Now that we have the source code, we need to compile it using the afl-clang-fast compiler. This will ensure that the binary is sufficiently instrumented. As target-app has an autoconfigure script (configure.sh), we compile by providing compilation settings andusing the standard “configure” and “make”
$  CC="afl-clang-fast" CFLAGS="-fsanitize=address -ggdb" CXXFLAGS="-fsanitize=address -ggdb" ./configure
$ make
If all goes well, the screen output of [make] should show successful instrumentation taking place during the compile process - Similar to the image shown below.

The final preparation step is to copy a suitable input file into the ~/targets/in directory. When initialised afl-fuzz will initially provide this input file to the target binary. Select an input file of the appropriate extension and of small size, and place it in the ~/targets/in directory.
Let the Fuzzing Begin!#
Finally, we are in a position to begin the fuzzing process. As a quick recap, we have successfully installed and optimised AFL, we have obtained and compiled the target binary using afl-clang-fast and we have placed input testcases (.png and .gif files) in the /in directory.
The final step is to begin the actual fuzzer. The afl-fuzz command is used to run AFL, the complete command format for starting afl-fuzz is as follows:
$ afl-fuzz -i [PATH TO TESTCASE_INPUT_DIR] -o [PATH TO OUTPUT_DIR] -- [PATH TO TARGET BINARY] [BINARY_PARAMS] @@In our scenario, this translates to
$ cd ~/targets
$ afl-fuzz -i in/ -o out/ -- target-app_directory/target-app_binary @@
Once AFL fires up and gets to work, you can sit back and admire your handy work. Attention must now turn towards monitoring the progress of afl-fuzz, to ensure that afl-fuzz is successfully finding new code execution paths within the target binary and running efficiently. Whilst running, afl-fuzz displays a basic UI, which displays a number of metrics to the user.
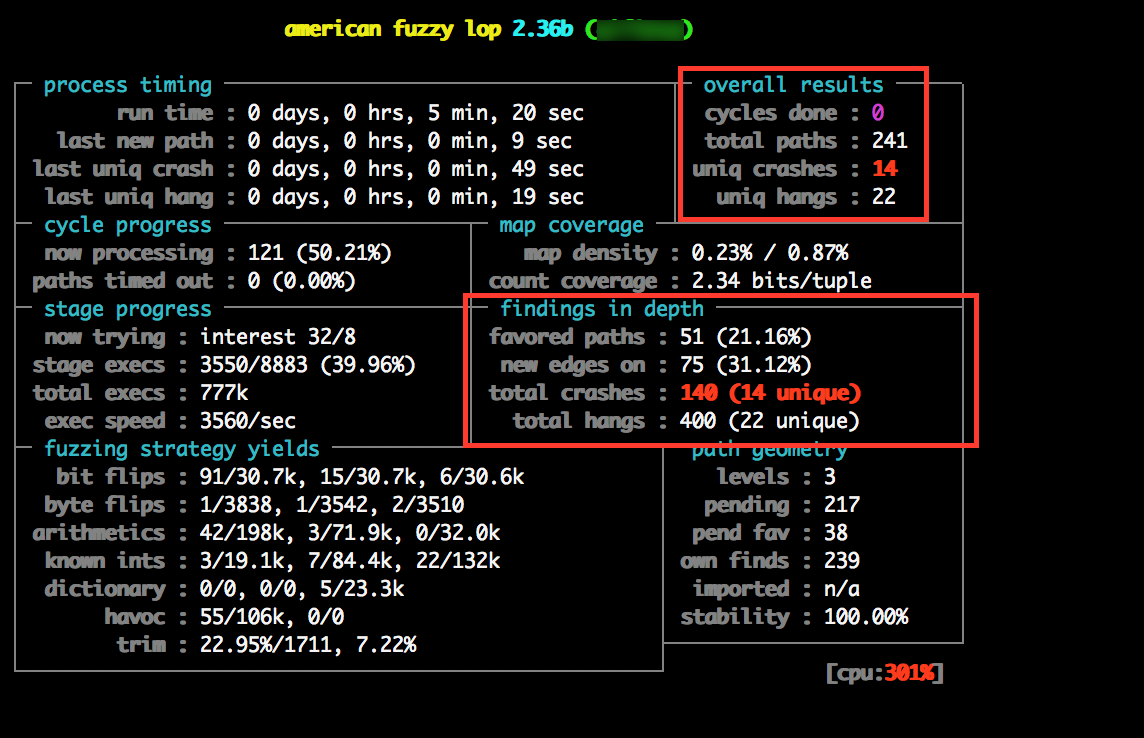
The amount of time required to sufficiently fuzz an application is dependent on several factors such as the amount of processing power available to the fuzzing system and the complexity and execution speed of the target binary. Fuzzing may exhaust huge amounts of time and resources so its important that we fuzz effeciently and know when to stop and to ensure that the tool is functioning correctly.
The 2 areas of the the afl-fuzz UI that are of spefic interest to us (right now) are located at the top right (overall results) and center right (findings in depth). The overall results section gives us an indicator as to whether or not afl-fuzz is successfully discovering new code execution paths, if this number isn’t increasing, there is a strong possibility that something isn’t working as expected and requireing investigation. Unique crashes is the next value of interest, this figure shows us the number of unique crashes, which is for all intents and purposes, the number of “potential” security vulnerabilities.
Generally you should try to continue fuzzing for as long as possible, or at the very least you should try and continue until several unique crash cases have been reported. Once you are ready to begin exploring crash data, quit afl-fuzz by issuing Ctrl+C.
Crash Exploration (PART 1)#
As mentioned earlier. We WANT our target binary to crash and the more times the better as each unique crash represents the potential to identify a security flaw. Once AFL has worked its magic for you, it’s time to begin exploring each unique crash.
During crash exploration our goal is to determine why and how the binary crashed, and what is the unique property of the test input file that caused the crash.
AFL stores each testcase that it generates and feeds to the target binary in the location you specified with the -o switch when launching afl-fuzz. This is generally referred to as the “out” location. Testcases that resulted in a unique crash are stored in a sub directory, in our test environment this is ~/targets/out/crashes.
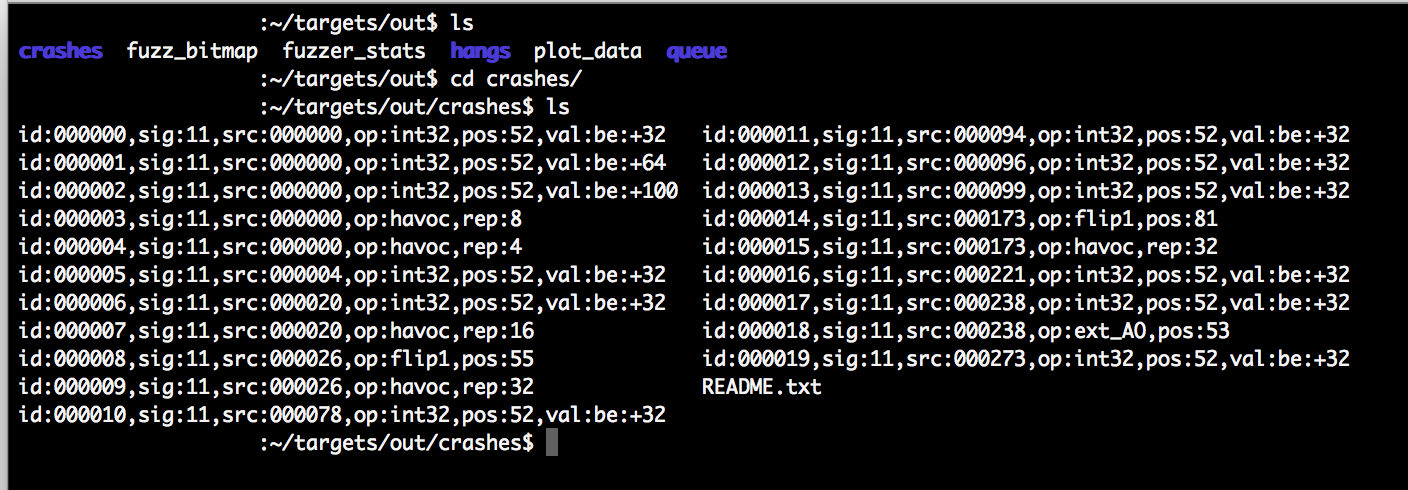
Whilst writing this post I ran afl-fuzz for approximately 12 hours, during this time 28 unique crashes of the target binary were detected. The input file that resulted in the crash is copied to the ~/targets/out/crashes/ directory.
id:000000,sig:11,src:000000,op:int32,pos:52,val:be:+32
id:000001,sig:11,src:000000,op:int32,pos:52,val:be:+64
id:000002,sig:11,src:000000,op:int32,pos:52,val:be:+100
id:000003,sig:11,src:000000,op:havoc,rep:32
id:000004,sig:11,src:000000,op:havoc,rep:8
id:000005,sig:11,src:000000,op:havoc,rep:16
id:000006,sig:11,src:000000,op:havoc,rep:32
id:000007,sig:11,src:000000,op:havoc,rep:16
id:000008,sig:11,src:000004,op:int32,pos:52,val:be:+32
id:000009,sig:11,src:000019,op:int32,pos:52,val:be:+32
id:000010,sig:11,src:000020,op:int32,pos:52,val:be:+32
id:000011,sig:11,src:000078,op:int32,pos:52,val:be:+32
id:000012,sig:11,src:000096,op:int32,pos:52,val:be:+32
id:000013,sig:11,src:000099,op:int32,pos:52,val:be:+32
id:000014,sig:11,src:000181,op:int32,pos:52,val:be:+32
id:000015,sig:11,src:000212,op:int32,pos:52,val:be:+32
id:000016,sig:11,src:000252,op:havoc,rep:4
id:000017,sig:11,src:000269,op:int32,pos:64,val:be:+32
id:000018,sig:11,src:000274,op:int32,pos:52,val:be:+32
id:000019,sig:11,src:000328,op:havoc,rep:4
id:000020,sig:11,src:000363,op:int32,pos:209,val:be:+32
id:000021,sig:11,src:000171,op:flip1,pos:63
id:000022,sig:11,src:000354,op:havoc,rep:64
id:000023,sig:11,src:000358,op:int32,pos:242,val:be:+32
id:000024,sig:11,src:000373,op:int32,pos:211,val:be:+32
id:000025,sig:11,src:000373,op:havoc,rep:8
id:000026,sig:11,src:000481,op:havoc,rep:4
id:000027,sig:11,src:000369,op:int32,pos:368,val:be:+32
id:000028,sig:11,src:000459,op:flip1,pos:332
AFL provides a crash exploration script in /afl-2.36b/experimental/crash_triage/ which we can use to get a first glimpse at the crash data. The script is named triage_crashes.sh and must be provided with the PATH to both the /out directory and the target binary, as follows:
$ cd AFL/afl-2.36b/experimental/crash_triage/
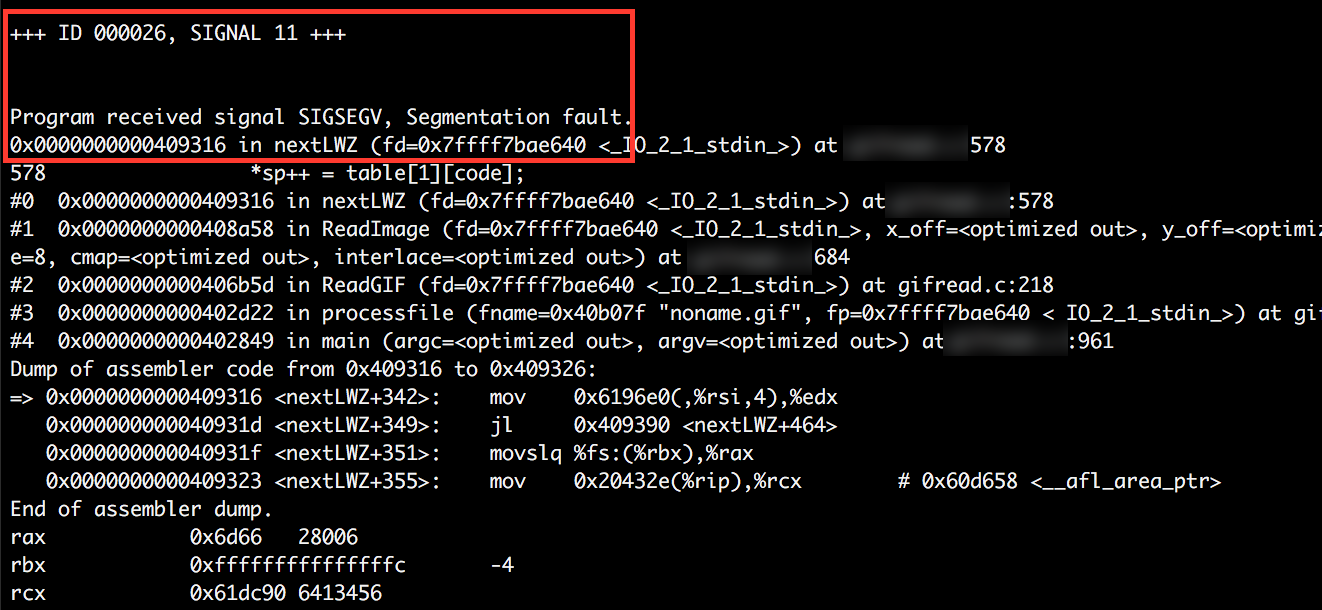
$ ./triage_crashes.sh ~/targets/out/ ~/targets/target-app/target-app_binaryWhen run the triage script will cycle through each crash file in /out/crashes directory and print the resulting crash data to the screen. Highlighted in the first image is the initial information of interest be reviewed, it provides some basic information about the crash. In the case of the first image below, we can see that the target binary experienced a segmentation fault when afl-fuzz attempted to use a particular variant of the test input file. This usually means a memory corruption has occured but doesn’t provide much further information to the nature of the crash.
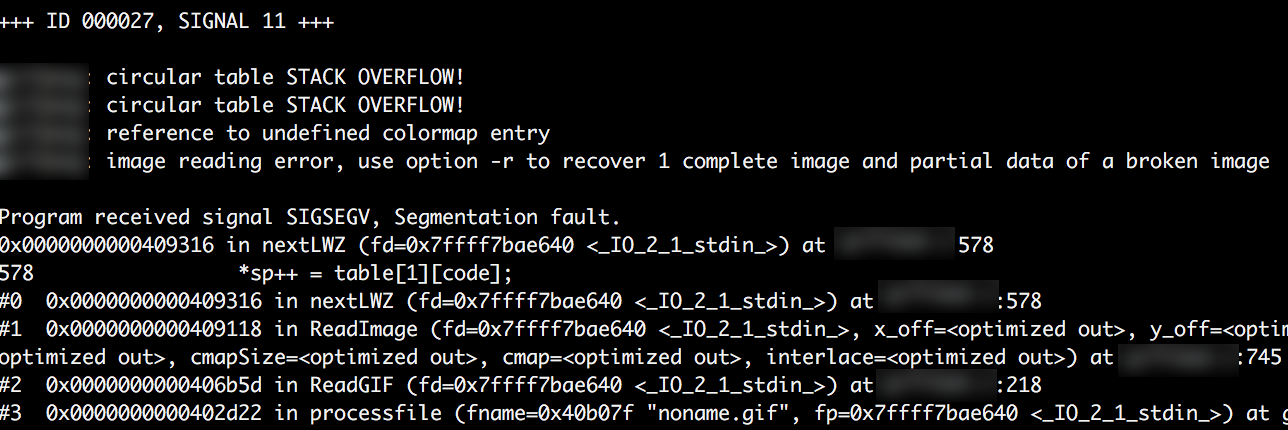
The second crash data I’ve included alludes to a slightly more interesting type of crash, here we see that a stack overflow has been detected, crashes such as the below should be explored further.
Conclusion#
That’s all for now. In this post I’ve tried to cover some of the basics of getting up and fuzzing with AFL and searching for software bugs. I hope to write a follow up post some time in the future, that picks up where this one leaves off and will continue with the crash data exploration process.
Disclaimer#
The information in this article is provided for research and educational purposes only. Aura Information Security does not accept any liability in any form for any direct or indirect damages resulting from the use of or reliance on the information contained in this article.